We are reader supported. When you purchase through links on our site, we may earn an affiliate commission. Also, as an Amazon affiliate, we earn from qualifying purchases.
Your aquarium filter is the heart of your tank. When it slows down or stops, water quality declines fast, fish get stressed, and problems multiply. The good news is that most filter failures are simple to diagnose and fix at home. This guide walks you through clear steps to find the cause, correct it, and prevent it from happening again. Follow along from quick checks to deeper repairs, with friendly notes for each filter type.
Quick diagnosis at a glance
No power and silent. Likely a tripped outlet, failed power supply, or dead motor.
Humming but no flow. Often an airlock, jammed impeller, or dry filter that needs priming.
Weak flow. Usually clogged intake, clogged media, restricted hoses, or dirty impeller.
Leaking. Commonly a mis-seated O ring, cracked tubing, or loose clamps.
Rattling or grinding. Debris in the impeller, worn impeller bushing, or vibration against the stand.
Cloudy water despite running. Biological media damage, overcleaning, or tank overload.
Safety first
Unplug equipment before touching water or opening a filter.
Use a drip loop on all cords to prevent water from reaching outlets.
Plug into a GFCI outlet or use a GFCI adapter for shock protection.
Dry your hands and the area around outlets before reconnecting power.
If you see water on the floor near power strips, stop and clean up before proceeding.
Know your filter type
Hang on back filters
They hang on the rim. An impeller driven by a small motor pulls water up an intake tube. They must be primed by filling the filter box with water before powering on.
Canister filters
They sit below the tank. A sealed canister pumps water through hoses and media baskets. Good flow depends on proper priming, sealed O rings, and clean hoses.
Internal power filters
They sit inside the tank and pump water directly. They are easy to prime but can clog fast if placed too low in substrate or behind decor.
Sponge and air driven filters
An air pump drives bubbles that lift water through a sponge. Flow depends on air pump strength, airline integrity, and clean sponges or stones.
Undergravel filters
They pull water through the gravel bed. Flow drops when gravel is packed with debris or when the air pump or powerhead is undersized or clogged.
Step by step troubleshooting checklist
1. Power and electrical
Check the outlet with another device to confirm power.
Inspect the plug, cord, and any power bricks for damage or heat marks.
Reset GFCI if tripped. Reset surge protectors if used.
Confirm the filter switch is on. Many canister and HOB models have small rocker switches.
Try a different outlet temporarily to rule out wiring issues.
2. Priming and airlocks
Air trapped in the system prevents water flow.
Hang on back. Fill the filter box completely with tank water. Ensure the intake tube is full of water and submerged. Power on. Tilt slightly to release trapped air.
Canister. Use the primer button or siphon method to fill the canister and hoses with water before starting. Lift and gently rock the canister to burp air. Ensure intake and return are fully submerged.
Air driven. Replace or wet the air stone if it is dry and not bubbling. Check the non return valve direction.
3. Intake and outflow path
Inspect the intake strainer for plant matter, snail shells, or sludge. Clean it.
Ensure the intake tube is firmly seated and has no cracks or pinholes that can pull air.
Check hoses for kinks, sharp bends, or crushed sections. Shorten long hoses to reduce resistance.
Confirm the outflow is not blocked by decor or algae mats. Aim outflow for surface movement without blasting fish.
4. Media and clogging
Mechanical media collects debris first and will choke flow. Rinse sponges and pads in removed tank water until the brown water runs mostly clear. Do not sterilize.
Rinse biological media gently in tank water only. Chlorine from tap water can kill beneficial bacteria.
Replace fine polishing pads last in the stack since they clog fastest. Do not use them full time unless needed.
Do not replace all media at once. Stagger changes to preserve bacteria.
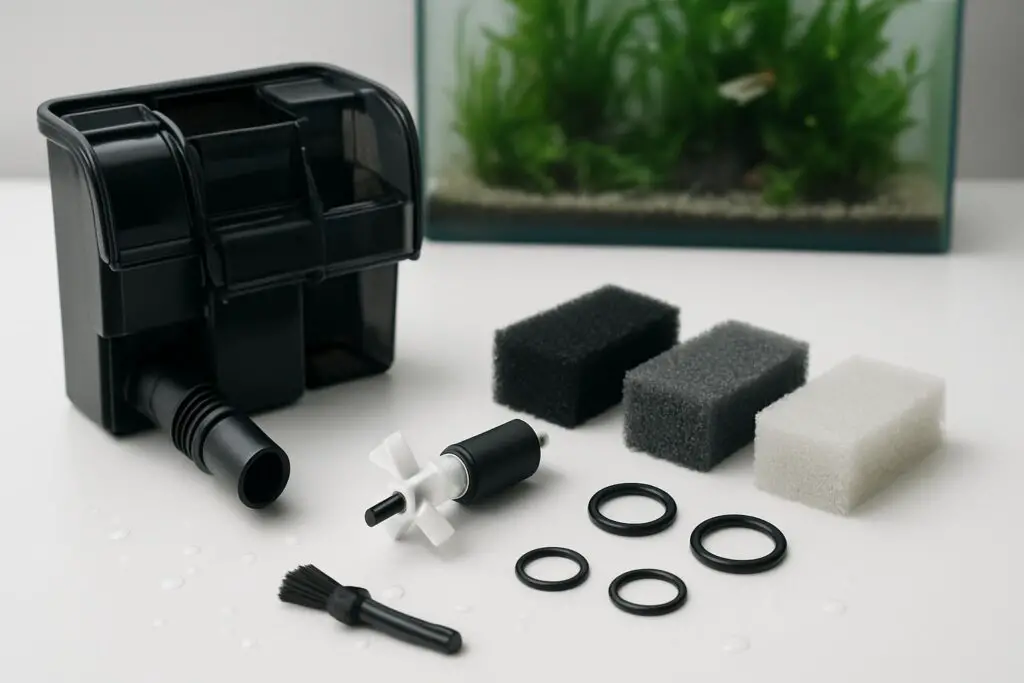
5. Impeller and motor
Unplug the filter. Remove the impeller cover. Pull out the impeller and shaft carefully.
Clean slime, hair algae, sand, or grit from the impeller, shaft, and impeller well. A cotton swab helps.
Inspect bushings or rubber end caps for wear. Replace if deformed.
If the impeller magnet is swollen or cracked, replace it. A swollen magnet drags and stalls.
Reassemble firmly. A mis-seated impeller cover causes noise and lost prime.
6. Leaks and seals
On canisters, examine the main O ring and all gaskets. Clean the groove and rim. Use a small amount of silicone grease on O rings. Do not use petroleum jelly.
Check hose clamps and quick disconnects. Tighten evenly. Replace brittle tubing.
Ensure the canister lid is locked uniformly on all sides. Even a small tilt can leak.
7. Noise and vibration
Vibration against a cabinet amplifies noise. Place a foam pad under the filter or adjust feet.
Rattling indicates an impeller issue. Clean and reseat. Replace worn parts.
Gurgling comes from air. Reprime and secure intake joints to stop air draw.
8. Flow rate and head height
Canisters lose flow if the vertical distance from the tank to the canister is too large or if hoses are too long. Shorten hoses and lower head height within the manufacturer range.
High density media reduces flow. Arrange media so that coarse mechanical comes first, then biological, then fine polishing last.
9. After a power outage
If the filter was off for several hours, the water trapped inside can go anoxic. This may smell sour. Rinse media in tank water. Discard the old filter water. Reprime and restart.
Hang on back filters may not self prime after an outage. Manually fill the filter box and intake before powering on.
Filter specific fixes
Hang on back filters
Symptom. Hums but no water lifts.
Fix. Fill the filter box with tank water. Ensure the intake tube and impeller well are full. Clear the impeller and intake of debris. Tilt the unit slightly to release bubbles, then level it. Ensure the water level in the tank is high enough to cover the intake fully.
Symptom. Starts then stops.
Fix. Check for intermittent air draw at intake joints. Push together firmly. Replace O rings or gaskets on modular intake sections. Inspect for sand or grit in the impeller well.
Symptom. Water bypasses media and returns dirty.
Fix. Ensure the media basket is seated and not warped. Replace swollen cartridges. Add a sponge insert to force water through media rather than around it.
Canister filters
Symptom. Will not prime or keeps sputtering.
Fix. Confirm all hoses and the canister body are filled with water before starting. Use manual primer pumps until firm resistance is felt. Tilt and gently shake to move trapped air to the head. Verify intake and return are submerged. Check quick disconnect valves for trapped air pockets.
Symptom. Leaks after maintenance.
Fix. Clean and inspect the main O ring. Lubricate with silicone grease. Remove grains of sand or grit from the sealing surfaces. Seat the lid evenly. Tighten clamps in a cross pattern. Replace brittle hoses or cracked fittings.
Symptom. Flow is much weaker than usual.
Fix. Clean prefilter sponges. Rinse media in tank water. Brush out hoses to remove biofilm. Ensure no kinks or loops that trap air. Confirm the impeller spins freely without wobble.
Sponge and air driven filters
Symptom. Bubbles stop or are very weak.
Fix. Check the air pump is running and not blocked. Ensure the airline is connected tightly and not pinched. Replace clogged air stones. Clean the check valve and confirm direction. Squeeze the sponge in removed tank water until flow returns.
Symptom. Water stays cloudy with a sponge filter.
Fix. Add a coarse prefilter or switch to a larger sponge. Increase air pump output. Reduce feeding and vacuum detritus more often.
Internal power filters
Symptom. Vibrates and rattles.
Fix. Reseat suction cups. Place a thin pad behind the unit to dampen vibration. Clean impeller and shaft. Ensure no gravel is lodged in the intake.
Symptom. Flow stalls when placed near the substrate.
Fix. Raise the unit or add a prefilter sponge to prevent sand ingestion.
Undergravel filters
Symptom. Weak or uneven flow through uplift tubes.
Fix. Vacuum the gravel thoroughly to remove packed debris. Upgrade to a stronger air pump or powerhead. Ensure uplift tubes are fully seated and not cracked. Clean the riser and stone.
When the filter runs but water quality is poor
A filter that runs does not always filter well. The biology inside the media is vital.
Do not replace all media at once. Stagger changes to preserve beneficial bacteria.
Do not rinse biological media in tap water. Chlorine can kill the bacteria that remove ammonia and nitrite.
Rinse mechanical sponges and pads in removed tank water. Swish until major debris is gone. Avoid squeezing them completely sterile.
Use a water conditioner that neutralizes chlorine and chloramine at every water change.
Test water weekly for ammonia, nitrite, and nitrate. Any ammonia or nitrite means the biofilter is stressed or crashed.
If the filter was off for hours, some bacteria may have died. Rinse media in tank water, restart, and reduce feeding until parameters are stable.
Do not overfeed. Excess food overwhelms mechanical and biological stages. Feed what fish consume within a few minutes.
Media layout tips that protect flow
First stage coarse sponge. Traps big debris and protects later stages.
Second stage biological. Ceramic rings, sintered glass, or bio balls with high surface area.
Optional fine polishing pad last. Use short term for water clarity, not as a permanent layer.
Place a prefilter sponge on intakes. It collects debris before it enters the filter and keeps the impeller cleaner.
Preventive maintenance schedule
Weekly. Confirm flow looks normal. Clean intake strainers. Rinse prefilter sponges in removed tank water. Check for leaks and salt creep on marine tanks. Ensure surface agitation is adequate.
Every two to four weeks. Rinse mechanical sponges and pads in tank water. Swish biological media lightly. Wipe the impeller, well, and motor housing. For canisters, clean hoses to remove biofilm.
Every three to six months. Replace worn impeller bushings and O rings. Grease canister gaskets with silicone grease. Replace or deep clean air stones. Inspect power cords and suction cups.
Anytime flow drops. Clean mechanical stages and impeller. Inspect for kinks or air leaks.
Common spare parts to keep on hand
Impeller and shaft. They wear and are easy to swap.
Main O ring and small gaskets. Essential for canister seals.
Prefilter sponges. They clog fast but are cheap and effective.
Airline, check valves, T connectors, and air stones. For air driven setups.
Hose clamps and short lengths of tubing. For quick fixes on canisters.
Tank setup factors that affect filter performance
Stocking level. More fish and more feeding produce more waste. Match filter capacity to the bioload. Consider adding a secondary sponge filter as backup.
Substrate choice. Fine sand can enter impellers and cause wear. Use a prefilter and keep intakes slightly above the sand bed.
Plant debris. Live plants are helpful but shed leaves. Clean strainers more often in heavily planted tanks.
Flow preference of species. Some fish dislike strong currents. Use spray bars, directional nozzles, or baffles to distribute flow without reducing total filtration.
When to repair and when to replace
Repair if you can replace an impeller, bushings, O rings, or tubing at reasonable cost. These parts restore most units.
Replace if the motor smells burnt, the housing is cracked, or the model has no available parts. Frequent leaks or repeated stalls can mean the unit is past its service life.
Do not delay. Running a failing filter risks a crash in water quality.
Simple startup routine after maintenance
Rinse mechanical media in tank water. Lightly swish biological media.
Rebuild the media stack coarse to fine. Ensure tight fits to prevent bypass.
Fill the filter body with tank water. Fill hoses if using a canister.
Prime thoroughly. Burp air by tilting and rocking gently.
Power on and watch for full flow within one minute.
Check for leaks and listen for odd noises. Correct immediately.
Troubleshooting examples
Case. Filter hums after water change and no flow appears.
Action. Fill the HOB box, ensure intake is submerged, clean impeller of sand, tilt to release air, and power on again.
Case. Canister runs but sputters every few minutes.
Action. Shorten hoses, check for a tiny air leak at intake joints, reseat connectors, and reprime. Clean the O ring and apply silicone grease.
Case. Cloudy water persists though filter runs well.
Action. Reduce feeding, clean mechanical media, verify biological media was not rinsed in tap water, and avoid changing all media at once. Consider a temporary fine pad for polishing.
Key takeaways
Always prime and remove air before expecting full flow.
Keep intakes clear and use a prefilter sponge.
Rinse media in tank water to protect beneficial bacteria.
Maintain seals and hoses to prevent leaks and air draw.
Test water regularly and respond early to small flow changes.
Conclusion
A filter that stops or slows is stressful, but the fix is usually straightforward. Work from power and priming to intake, media, and impeller. Clear air, remove clogs, and protect the biological stage. Maintain seals and hoses on canisters. Keep spare parts ready. With a simple routine, your filter will restart reliably after water changes and power blips, and your fish will enjoy stable, clean water.
FAQ
Q: My filter hums but no water moves. What should I check first
A: Confirm power, then prime to remove air. Check for a clogged intake, a jammed or dirty impeller, and any kinks or air leaks in hoses. Fill the filter body with tank water and burp air before powering on.
Q: How do I prime a hang on back filter that will not start
A: Fill the filter box completely with tank water, ensure the intake tube is full and submerged, clean and reseat the impeller, then plug in. Tilt slightly to release trapped air and level it once flow begins.
Q: Can I wash filter media under tap water
A: Do not rinse biological media in tap water. Rinse mechanical sponges and pads in removed tank water instead. Chlorine in tap water can damage beneficial bacteria.
Q: My canister filter leaks after cleaning. What is the usual culprit
A: A mis seated or dry O ring, debris on the sealing rim, loose clamps, or brittle hoses. Clean and lubricate the O ring with silicone grease, reseat the lid evenly, and tighten clamps in a cross pattern.
Q: After a power outage the filter smells sour. Is it safe to run
A: If the filter sat off for several hours, rinse the media in tank water, discard the stale filter water, reprime, and restart. Reduce feeding while the biofilter recovers.