We are reader supported. When you purchase through links on our site, we may earn an affiliate commission. Also, as an Amazon affiliate, we earn from qualifying purchases.
Axolotls are unique, hardy, and surprisingly sensitive all at once. Set up the right environment from day one and most problems never happen. This guide walks you through a clear, beginner friendly plan to build a stable axolotl aquarium and keep it healthy long term. Follow each step in order. Keep notes. Make small, measured changes. Your axolotl will reward you with calm behavior, steady growth, and a long life.
Introduction
New keepers often focus on buying the axolotl first and the tank later. Reverse that thinking. The environment is the care. Successful axolotl keeping starts with a cool, clean, low flow setup and a fully cycled filter. You do not need fancy gear, but you do need the essentials done correctly. This article explains the why and the how, so you can avoid costly mistakes, prevent stress, and build a tank that stays predictable all year.
Meet the Axolotl: What Makes Them Different
Coldwater amphibian, not fish
Axolotls are amphibians that live their entire lives in water. They prefer cool conditions and steady parameters. Warmth and fast currents stress them quickly. Plan your tank around low temperatures and gentle water movement.
Sensitive skin and gills
Axolotl skin and external gills are delicate. Chlorine, chloramine, high ammonia, and rough decor will cause damage fast. Choose water conditioners that neutralize chlorine and chloramine, keep ammonia and nitrite at zero, and avoid sharp surfaces. Clean water is not a luxury for axolotls. It is a daily requirement.
Growth and lifespan
With good care, axolotls commonly live 10 to 15 years. They grow quickly in the first year and can reach 20 to 30 cm. Plan your tank size and filtration for the adult, not the juvenile. A tank that is barely enough now will be too small in a few months.
Tank Setup Essentials
Tank size and shape
Start with at least 75 liters for one axolotl, with a footprint that is wider than it is tall. A 90 to 110 liter tank is more forgiving and helps with temperature stability. Add 40 to 60 liters for each additional axolotl. Height is less important. Floor space matters more for walking, feeding, and oxygen exchange at the surface.
Location and stand
Place the tank in a cool, quiet room away from sun and heat sources. Keep it off windows, radiators, and kitchens. Use a solid stand that supports the full base of the tank. Install a tight fitting lid; axolotls can jump, and a lid helps with evaporation control and cooling strategies.
Substrate choices: bare bottom vs sand
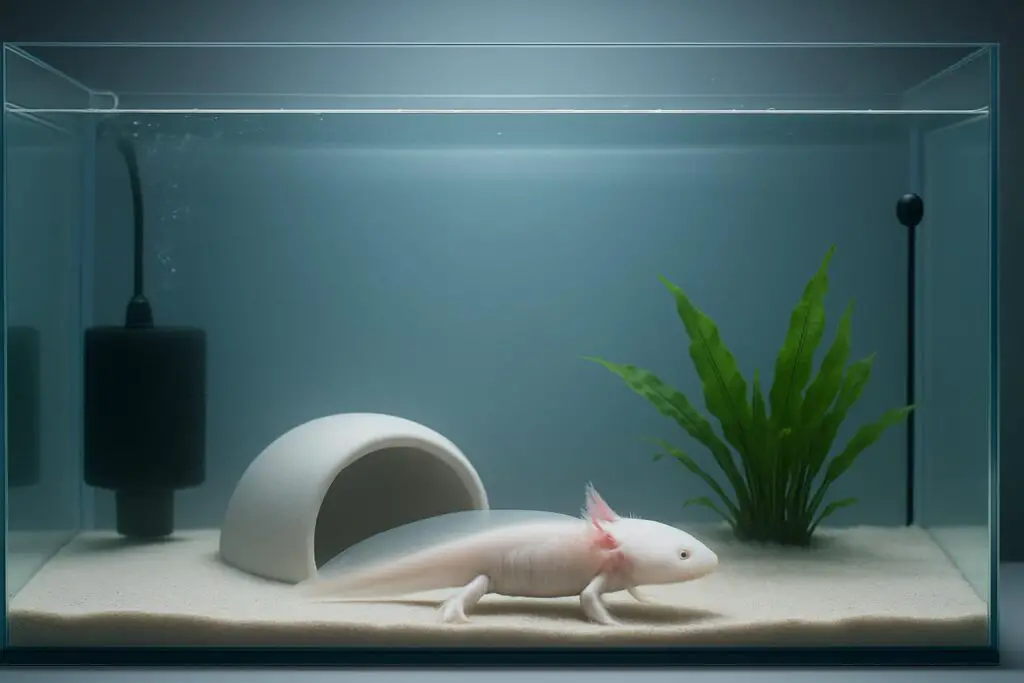
Bare bottom is the safest and easiest for cleaning, especially for beginners. If you want substrate, use fine sand with grains under one millimeter. Avoid gravel and pebbles. Axolotls will swallow small stones and can become impacted. Smooth ceramic tiles are another safe option and allow easy waste removal.
Filtration that works with low flow
Axolotls need strong biological filtration but gentle water movement. Sponge filters powered by air are ideal for low flow tanks. Canister filters also work if you reduce the output with a spray bar and a prefilter sponge on the intake. Hang on back filters are acceptable only if you baffle and slow the flow. Aim for calm water with no strong current across the axolotl. Oversize the bio media and use coarse to fine sponges. Rinse filter sponges in tank water during maintenance to preserve bacteria.
Heating and chilling
Axolotls are coldwater animals. Most homes run too warm in summer. Heaters are usually not needed. A chiller or a reliable cooling plan is often required. Keep the temperature 14 to 18 C whenever possible. Short periods down to 10 C or up to 20 C are tolerable, but avoid extended time above 20 C. Temperature swings should be under 2 C per day to prevent stress.
Lighting and photoperiod
Axolotls prefer dim light. Use a low intensity LED and provide shaded areas with caves and plants. Keep the lights on for 6 to 8 hours if you keep live plants. If you keep only hides and no plants, you can run even shorter photoperiods. Bright lights without cover will make axolotls hide constantly and refuse food.
Water Quality and Cycling
Why cycling matters
Cycling builds beneficial bacteria that convert toxic ammonia from waste into nitrite and then nitrate. Without this biofilter, axolotl waste will burn gills, reduce appetite, and cause disease. A cycled tank runs smoother and smells clean.
How to cycle before the axolotl arrives
Set up the tank with filter, substrate, and dechlorinated water. Add a source of ammonia to feed the bacteria. Use pure household ammonia without scents, or use fish food that will decay, or use a bottled bacterial starter paired with a small ammonia source. Keep the filter running and the temperature around 18 to 22 C during cycling to encourage bacterial growth. Test every two to three days. First you will see ammonia, then nitrite, then nitrate. When you can dose ammonia to about 2 ppm and the filter processes it to nitrate within 24 hours with zero ammonia and zero nitrite, the tank is cycled. Do a large water change to reduce nitrate before adding the axolotl.
Ongoing testing and target parameters
Test weekly and any time behavior changes. Targets for axolotls are zero ammonia, zero nitrite, nitrate under 20 to 40 ppm, pH 6.8 to 8.2, KH 3 to 8 dKH, and GH 7 to 14 dGH. Use a water conditioner that handles chloramine if your tap water contains it. If your tap has very low KH, add a small bag of crushed coral to the filter to stabilize pH. If your tap is very hard or has contaminants, consider remineralized reverse osmosis water.
Water changes and cleaning routine
Change 25 to 40 percent of the water weekly in a stocked tank. Vacuum visible waste and uneaten food. Wipe the glass gently to remove biofilm. Rinse prefilter sponges in removed tank water. Clean canister filters only when flow drops, and only part of the media at a time to preserve bacteria. Never use soap. Always match temperature during water changes to avoid shocking the axolotl.
Aquascaping for Comfort and Safety
Hides and layout
Give at least two hides per axolotl. Use smooth caves, PVC elbows, or ceramic tubes wider than the axolotl. Arrange decor to create line of sight breaks without trapping debris. Leave open space at the front for easy feeding and observation. Ensure all items are stable and cannot collapse.
Plants that tolerate cool water
Live plants help with nitrate control and provide shade. Choose hardy species that cope with low light and cool temperatures. Java fern, Anubias, hornwort, Elodea, and floating plants like water lettuce are common choices. Attach slow growing plants to rocks or wood rather than burying rhizomes. Secure floating plants so they do not block surface gas exchange.
Decorations to avoid
Avoid sharp edges, rough plastic, small holes that can trap gills, and gravel that can be swallowed. Glued ornaments that leach paint or soft plastics that smell strongly are risky. If in doubt, soak the item and check for odors and dye. Keep magnets and metals out of the tank.
Temperature Control Without Stress
Keep it cool year round
Consistent cool temperatures protect appetite, immunity, and gill health. If your room is cool, the tank may hold 16 to 18 C without special equipment. If not, plan ahead. Good insulation, a lid, and a chiller or fans can keep temperatures in range.
Summer heat plan
Have a plan before the first heat wave. Options include a dedicated aquarium chiller, room air conditioning, fan driven evaporative cooling across the water surface, and frozen water bottles for emergency dips. Combine methods for best results. Monitor with a reliable thermometer and keep daily swings small. Top off evaporated water with dechlorinated water that matches temperature.
Power outages and stability
During outages, temperature control and oxygen are priorities. Wrap the tank in blankets for insulation if the room warms. Use a battery air pump to keep the water oxygenated and the biofilter alive. Stop feeding until power returns. When power is back, test water and perform a partial change if needed.
Feeding for Health and Growth
Staple foods
Earthworms are the best staple for juveniles and adults. They are nutritious, clean, and easy to portion. Quality sinking axolotl or salmon pellets are also solid staples. For juveniles, thawed bloodworms or blackworms can help, but transition to earthworms and pellets as soon as possible. Avoid feeder fish and insects from unknown sources due to parasites and pesticides.
Feeding schedule by age
Feed juveniles daily until they are growing steadily and filling out. Feed subadults every other day. Feed adults two to three times per week. Each meal should be enough to create a gentle curve in the belly without bulging. Adjust portions based on body condition, temperature, and activity.
How to avoid mess and fouling
Target feed with tongs or a feeding dish. Remove leftovers within 15 minutes. Earthworms can be cut into appropriate lengths to reduce refusal. Pellets should sink quickly and resist disintegrating. Keep a turkey baster or siphon ready to spot clean after meals.
Supplements and treats
With a base of earthworms and a good pellet, supplements are rarely needed. Variety is helpful but do not overdo fatty treats. Occasional offerings of high quality prawn or mussel can be fine, but rinse well and feed sparingly. Avoid mammal meats and processed foods. Calcium powders are not needed for water dwelling axolotls.
Tankmates and Compatibility
Axolotl with axolotl
Keeping axolotls together is possible when they are similar in size, well fed, and provided with space and hides. Nips can still happen, especially at feeding time. House juveniles separately until they reach a safe size. Do not mix significantly different sizes.
Fish, snails, and shrimp
Axolotls do best alone. Fish often pick at gills or are eaten. Plecos and other armored fish can injure axolotls and are a poor match. Snails can introduce parasites and may be swallowed. Shrimp will be eaten and can stress axolotls by constant movement. If you value a calm, predictable tank, skip tankmates.
Handling, Quarantine, and Safety
Minimal handling
Handle only when necessary. Wet your hands with tank water or use a soft, fine mesh net and a container to move the axolotl. Support the body fully. Never grab gills or tail. Plan maintenance so the axolotl can stay in the tank while you work.
Quarantine new additions
Quarantine any new axolotl or live plants for at least 30 days in a separate, cycled setup. Observe for fungus, parasites, or unusual behavior. Disinfect nets and tools between tanks. Never share filter media or water during quarantine.
Safe maintenance practices
Unplug equipment before water changes. Keep electrical connections dry and drip looped. Use a dedicated bucket and siphon for the axolotl tank only. Condition new water before it enters the tank. Warm or cold shocks can trigger stress even if everything else is perfect.
Health Monitoring and Troubleshooting
Daily and weekly checks
Each day, confirm temperature, behavior, appetite, and gill posture. Each week, test ammonia, nitrite, nitrate, and pH. Record results so you can spot trends. Patterns matter more than single readings.
Early signs of stress
Look for curled gill filaments, forward curled tail tip, persistent surface floating, frayed gills, pale or flushed skin, refusal to eat, and rapid gill movement. Most stress signs trace back to water quality, temperature, or flow. Verify those first before assuming illness.
Common issues and quick fixes
Ammonia or nitrite present: stop feeding, perform partial water changes, add extra aeration, and ensure the filter is not clogged. High nitrate: increase water change volume or add live plants. Heat stress: lower room temperature, dim lights, and start your cooling plan. Fungus on gills or toes: correct water quality and temperature first, then seek veterinary advice for treatment options. Impaction from swallowed gravel: remove substrate risk, keep water cool, monitor stool, and contact a vet if appetite and buoyancy do not normalize quickly.
When to call a vet
Call an experienced aquatic or exotic vet if you see deep ulcers, persistent fungal growth after water correction, severe bloat, rapid weight loss, repeated floating with loss of control, or injuries that expose tissue. Early intervention saves time and reduces stress.
Seasonal and Long Term Care
Growth stages and upgrades
Juveniles need frequent feeding, stable water, and low flow above all. As they grow, consider upgrading to a larger tank to improve stability and swimming room. Adults thrive in wider tanks with multiple hides and cool, clean water. Plan your upgrade timeline before the juvenile outgrows the current space.
Record keeping
Keep a simple log of test results, water changes, feeding, temperature, and observations. Records help you catch slow changes and prove what works in your home. They also help a vet diagnose issues faster if needed.
Deep cleaning without reset
Avoid full tear downs that remove all bacteria. If you must deep clean, keep filter media wet in tank water, clean decor in old tank water, and refill with conditioned water at matched temperature. Test daily for a week and be ready to do extra water changes while the biofilter rebounds.
Budget and Checklist
Equipment checklist
You will need an appropriate sized tank and lid, a sturdy stand, a gentle but capable filter with extra bio media, a reliable thermometer, a water conditioner that treats chlorine and chloramine, a freshwater test kit for ammonia, nitrite, nitrate, and pH, a siphon and dedicated bucket, safe hides and decor, and optionally live plants. In warm climates, plan for a chiller or a proven cooling setup with fans and room air conditioning. Prepare a battery air pump for outages.
Running costs
Ongoing costs include water conditioner, test kit reagents, replacement filter sponges, food such as earthworms and quality pellets, and electricity for filtration and cooling. Cooling is often the largest seasonal expense. A stable setup usually costs less over time because you spend less on emergency fixes.
Putting It All Together: Step by Step Setup
Build the foundation
Choose the tank size, stand, and location. Rinse sand if using, or go bare bottom or tile. Install the filter with a prefilter sponge and a spray bar or sponge filter. Add hides and secure decor. Fill with tap water, add water conditioner, and stabilize temperature.
Cycle the tank
Add an ammonia source and optional bottled bacteria. Run the system for several weeks, testing often. Be patient. When the tank processes 2 ppm ammonia to nitrate within 24 hours with zero ammonia and nitrite, perform a large water change to reduce nitrate. Double check temperature and flow.
Add the axolotl
Acclimate slowly by floating the transport container to match temperature, then add small amounts of tank water over 20 to 30 minutes. Release the axolotl gently near a hide. Leave the lights dim and do not feed for the first day. Observe calmly from a distance.
Maintain the routine
Feed on schedule, remove leftovers, test weekly, and change water every week. Keep temperatures steady. Clean filters as needed. Do not make multiple big changes at once. One variable at a time keeps the system predictable.
Frequently Avoided Mistakes
Too much flow
High flow is a common error. If you see the axolotl constantly fighting current or gills bent backward, reduce output, add baffles, or switch to a sponge filter. Calm water leads to calmer feeding and less stress.
Warm water creep
Temperatures slowly rising through the day can go unnoticed. Use a thermometer you trust and check morning and evening. If you exceed 20 C regularly, adjust your cooling plan now rather than later.
Skipping the cycle
Adding an axolotl to an uncycled tank often leads to illness. If you inherit an uncycled setup, be ready for daily testing, frequent water changes, and lots of aeration until the filter matures.
Unsafe substrates and decor
Gravel and small stones are risky. Sharp artificial plants and rough ornaments tear skin. Smooth and simple is safer and easier to clean.
Conclusion
Axolotl care is straightforward when you focus on environment first. Choose a cool, stable tank with low flow. Cycle completely before adding the animal. Keep water clean with regular testing and water changes. Feed a simple, reliable diet and avoid risky tankmates. Prepare for summer heat and power outages. With those fundamentals in place, your axolotl will thrive with minimal drama and you will enjoy a calm, beautiful aquarium for years.