We are reader supported. When you purchase through links on our site, we may earn an affiliate commission. Also, as an Amazon affiliate, we earn from qualifying purchases.
Cherry shrimp are one of the most rewarding freshwater invertebrates to breed at home. They are small, colorful, active, and fast to reproduce when you give them the right environment. You do not need an advanced setup or expensive equipment. You do need patience, stable water, and a clear plan. Follow this guide step by step, and you will build a thriving colony that keeps growing without constant intervention.
Introduction
Many shrimp keepers struggle at first. They set up a tank, add shrimp, and then wonder why babies never appear or why the colony stalls. The reason is almost always the same. The tank is not mature enough, parameters swing, food is not suited to shrimplets, or tank mates are not safe. Once you fix those basics, breeding becomes steady and predictable. This article gives you an exact path from empty tank to berried females and healthy shrimplets, written for beginners who want simple, repeatable steps.
Why Cherry Shrimp Are Ideal for Beginners
Cherry shrimp, Neocaridina davidi, are hardy compared to many shrimp species. They accept a wide range of parameters, breed readily in freshwater, and do not require specialized substrates or complex equipment. Their lifecycle is direct. Females carry eggs and release fully formed miniature shrimp. There is no larval stage. This makes care simpler and survival rates high if you keep water clean and stable.
Know the Basics: Biology and Behavior
Cherry shrimp live 1 to 2 years on average. Females are larger and rounder with deeper color. Males are slimmer and often paler. Females develop a saddle behind the head where eggs form in the ovaries. After mating, eggs move under the abdomen, where the female fans them until hatching. Depending on temperature, eggs hatch in about 2 to 4 weeks. Shrimplets graze biofilm, algae, and fine foods and need constant access to microscopic food and cover.
Tank Size and Equipment That Work
Recommended Tank Size
A 10 gallon tank is the sweet spot for beginners. It gives enough water volume to buffer small mistakes and enough space for a growing colony. Smaller tanks can work, but parameters swing faster.
Filtration and Flow
An air driven sponge filter is the best choice. It provides gentle flow, high oxygen, and a safe surface for shrimplets to graze. If you use a hang on back filter, add a prefilter sponge over the intake to prevent shrimplet loss. Keep flow moderate so shrimp can graze comfortably.
Heating and Temperature
Cherry shrimp breed across a wide range, but the safest target is 22 to 24 degrees Celsius. Warmer water speeds breeding but shortens lifespan and increases metabolism. Cooler water slows breeding. Stability matters more than chasing a number. Use a reliable heater if your room fluctuates.
Lighting
Low to moderate light is enough. Aim for 6 to 8 hours a day to encourage algae and biofilm without causing severe algae blooms. Floating plants help buffer light and absorb excess nutrients.
Substrate, Hardscape, and Plants
Substrate Choices
Inert sand or fine gravel works well. Avoid sharp substrates. You do not need active soil for Neocaridina. Active soils can lower pH and KH, which may be unstable for beginners.
Hardscape
Use inert rocks and driftwood. Cholla wood, spider wood, and smooth rocks provide surface area for biofilm. Boil or soak wood before use to reduce tannins and buoyancy. Ensure any metal mesh or guards are stainless steel suitable for aquariums.
Plants That Help Breeding
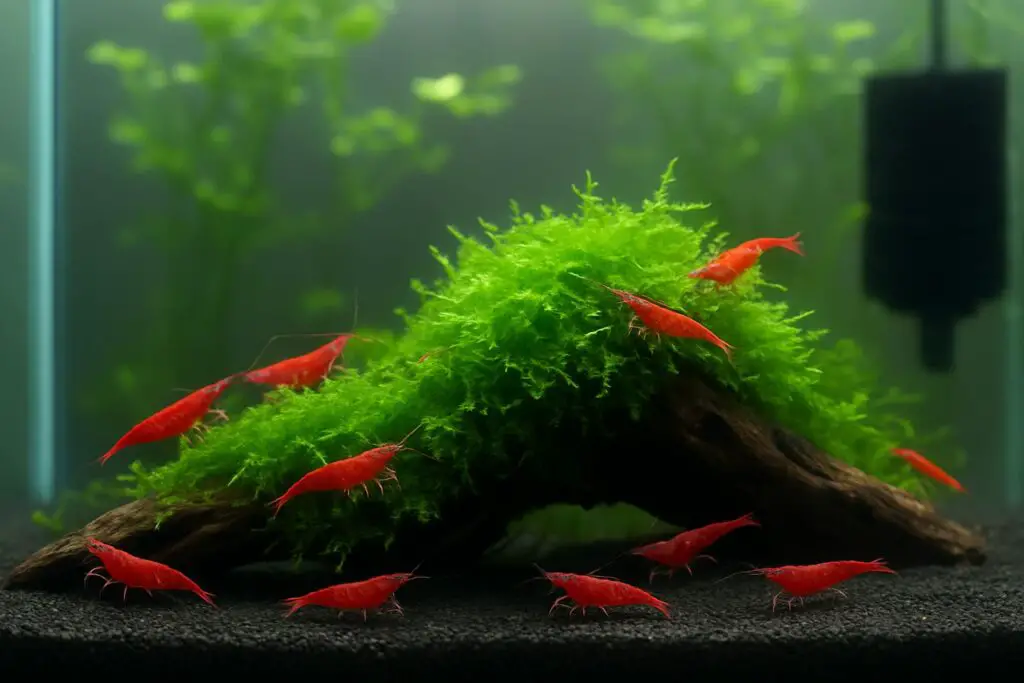
Mosses such as Java moss and Christmas moss are almost essential. They trap food and shelter shrimplets. Subwassertang, hornwort, guppy grass, and floating plants like Salvinia also work very well. Leaf litter such as Indian almond leaves supports biofilm growth and provides hiding spots. A planted, mossy tank produces more babies that survive.
Water Parameters and Why They Matter
Cherry shrimp tolerate variation, but breeding thrives under steady, shrimp friendly values. Use test kits and a TDS meter to measure and track changes.
Target ranges that work for most setups:
pH 6.8 to 7.6
GH 6 to 8 dGH
KH 2 to 4 dKH
TDS 150 to 250 ppm
Ammonia 0 ppm
Nitrite 0 ppm
Nitrate under 20 ppm
If your tap water fits these numbers and is stable, use it with a good dechlorinator. If your tap is very hard or very soft, use reverse osmosis water and remineralize with a shrimp specific GH and KH product. Stability beats perfection. Do not chase numbers daily.
Cycle the Tank Before Any Shrimp Arrive
A mature tank is the strongest predictor of breeding success. Start with a fishless cycle. Add a source of ammonia to about 2 ppm, seed with filter media or bottled bacteria, and wait until ammonia and nitrite both read zero within 24 hours of dosing. Keep the filter running, add plants, and let the tank run at least 4 to 6 weeks. During this time, biofilm builds and microfauna multiply. This forms the foundation of your colony.
Acquiring Healthy Stock
Buy shrimp from a reputable source that keeps them in similar water to yours. Ask about parameters. Healthy shrimp are active, hold a good posture, and show even coloration. Avoid shrimp that sit listlessly, have fungus, or show clear bacterial lesions. If possible, start with 12 to 20 individuals. A good male to female mix speeds breeding. Aim for about two females to one male so females are not overchased.
Quarantine and Plant Treatment
Quarantine new shrimp for 2 to 4 weeks in a small, cycled tank with a sponge filter and moss. Watch for disease, parasites like planaria, or hydra. This reduces the risk of wiping out your main colony. For new plants, rinse well and consider a gentle dip to remove pests. Peroxide or alum dips can help, but follow conservative recipes and rinse thoroughly. Skip harsh dips for delicate mosses.
Safe Acclimation
Use a slow drip acclimation method. Float the bag to match temperature for 15 minutes. Transfer shrimp and bag water to a small container. Drip tank water into the container for 1 to 2 hours until you triple the volume. Net the shrimp and place them into the tank. Discard the acclimation water. Dim the lights for the first day to reduce stress.
Feeding for Conditioning and Colony Growth
Biofilm and algae are the primary foods. A mature tank supplies this. Supplement 2 to 3 times per week with quality shrimp pellets, blanched vegetables like zucchini or spinach, and powdered foods such as spirulina or soybean hull powder for shrimplets. Rotate foods to provide variety. Feed sparingly so the tank finishes food within a few hours. Remove leftovers to prevent water quality issues.
Breeding Cycle and Triggers
Females molt and release pheromones. Males swim actively searching for them. After mating, eggs appear under the female abdomen. Typical clutch size ranges from 20 to 40 eggs depending on female size and condition. Eggs hatch in 2 to 4 weeks based on temperature. To encourage breeding, keep parameters stable, provide abundant biofilm, and avoid stressors. A small, stable weekly water change often triggers molts and mating.
Berried Females and Egg Care
A berried female constantly fans the eggs to oxygenate them and prevent fungus. She prefers dense plants and moss to reduce stress. Avoid netting or moving berried females unless necessary. If you must move her, use a container and move slowly to avoid dropping eggs. Provide high oxygen and gentle flow so eggs stay healthy.
Hatch and Early Shrimplet Survival
Shrimplets are fully formed and independent at hatch. They need three things every hour of the day. Constant micro food, dense cover, and clean, stable water. Moss, biofilm covered wood, and leaf litter solve the first two. Soft powdered foods improve survival dramatically. Light feeding daily with a pinch of ultrafine food will outperform heavy feeding twice a week. Keep nitrate low and avoid big parameter swings.
Minerals, Molting, and Shell Health
Molts drive growth and breeding. If GH is too low, you will see failed molts and deaths. Keep GH in the 6 to 8 range and provide a balanced diet. Cut coral, mineral stones, or a small piece of cuttlebone can help maintain calcium in lightly stocked tanks, but do not rely on them to fix a collapsing GH. Measure and adjust with proper remineralization salts after water changes. Avoid chasing iodine supplements. A varied diet covers trace needs for Neocaridina.
Tank Mates That Do and Do Not Work
The safest breeding setup is a shrimp only tank with snails. Nerite and ramshorn snails help clean and do not hunt shrimplets. Most fish will eat babies if given the chance. If you insist on fish, choose the smallest, calmest species and add them only after the colony is dense. Even then, expect fewer surviving shrimplets. Shrimp with shrimp is the proven route to a booming colony.
Maintenance Schedule That Protects Shrimplets
Perform small, regular water changes. Ten to twenty percent weekly or every other week is a good baseline. Match temperature and TDS. Add new water slowly using a drip or a gentle pour over the filter intake or a plate. Vacuum debris lightly. Do not deep clean the substrate or over rinse filters. Rinse sponges in removed tank water to preserve microbes. Stability over time is the winning strategy.
Algae and Biofilm Management
A thin layer of algae and biofilm is good. It feeds shrimp all day. If algae grows out of control, reduce light duration, add more fast growing plants, and feed less. Avoid strong algaecides in shrimp tanks. If you use fertilizers, choose shrimp safe options and dose lightly. Monitor copper content. Most plant fertilizers contain trace copper at safe levels when used as directed, but overdosing can be risky.
Common Problems and How to Fix Them
No Breeding After Months
Check gender ratio. If most are males, add more females. Check temperature. At 19 degrees Celsius or lower, breeding slows. Check food variety. Condition females with regular protein and minerals. Check maturity of the tank. If the tank is new, give it time and add extra biofilm sources like leaves and wood.
Adult Deaths After Water Changes
Match temperature and TDS better and add new water more slowly. Test for chlorine or chloramine and use a quality dechlorinator. Avoid large percentage changes unless you are correcting a serious issue.
Babies Disappear
Likely predation or lack of micro food and cover. Remove fish, increase moss density, dust powdered foods daily in small amounts, and ensure the filter intake is covered.
Failed Molts
Raise GH slightly, improve diet, and reduce stress from rapid parameter shifts. Confirm nitrate under 20 ppm. Ensure oxygenation and surface agitation.
Planaria or Hydra
Reduce feeding and siphon them during maintenance. Targeted treatments exist, but they may harm snails. Remove snails if you must treat, and research dosages carefully before use.
Genetics, Color Grades, and Culling
Cherry shrimp come in many grades and colors. If you mix lines or colors, expect offspring to drift toward wild patterns over time. If your goal is strong color, keep one color line per tank. Cull selectively by moving paler individuals to a separate tank. Culling keeps your main colony consistent and marketable if you plan to sell.
Population Management and Long Term Stability
A healthy colony grows fast. Overcrowding leads to stunting, slow growth, and more competition for food and minerals. Thin the population by selling or moving shrimp when the tank looks crowded on every surface. As you harvest, keep water changes regular and avoid overfeeding. A colony that grows at a controlled pace stays healthier.
Tap Water, RO Water, and Remineralization
Use tap water if it is stable and matches the target ranges. Condition it and test regularly. If your tap water swings seasonally or is outside the shrimp friendly window, switch to RO water and add a remineralizer that sets GH and KH together. Mix to your target TDS consistently and log each batch. Consistency is key.
CO2 and Fertilizers in Shrimp Tanks
Low tech planted shrimp tanks are simpler and safer for breeding. If you run CO2, keep injection stable and avoid pH swings. Dose fertilizers lightly and watch animal behavior after dosing. If shrimp seem stressed, reduce dosing and increase water changes. Activated carbon can help remove excess chemicals after any mistake.
Breeding Timeline You Can Expect
Weeks 0 to 4. Cycle the tank, plant heavily, and grow biofilm. No shrimp yet.
Weeks 4 to 6. Add the initial group. Feed lightly and watch behavior.
Weeks 6 to 8. First females saddle and then become berried after a molt and mating.
Weeks 8 to 12. First shrimplets appear. Increase powdered food slightly. Keep maintenance gentle.
Months 3 to 6. Colony ramps up. Consider culling to maintain color quality. Maintain stable parameters and a strict routine.
Practical Daily and Weekly Routine
Daily
Observe shrimp behavior. Check the filter output and air pump. Feed small amounts if biofilm looks thin or if babies are present. Top off evaporated water with remineralized water that matches your tank, not pure RO, to avoid dropping TDS.
Weekly
Test nitrate, TDS, and check pH. Perform a 10 to 20 percent water change with matched water. Clean the viewing panes lightly but leave some algae on hardscape for grazing. Rinse prefilter sponges in tank water.
Monthly
Trim plants and thin moss to prevent detritus buildup. Review population and remove culls or sell extras. Log parameter trends and adjust remineralization if needed.
Budget Setup That Still Breeds Well
Use a standard 10 gallon tank, a sponge filter with an air pump, a small heater, plain sand, a few clumps of Java moss, and a couple of pieces of cholla wood. Add floating plants and leaf litter. This simple kit, once mature, will breed cherry shrimp reliably without costly gear.
Safety Notes to Protect Your Colony
Avoid copper based medications and insect sprays near the tank. Wash hands and tools before working in the aquarium. Do not use soaps or household cleaners on or near aquarium equipment. Be careful with new decorations that may leach metals or chemicals. When in doubt, soak and test separately before placing items in the shrimp tank.
Scaling Up and Selling Shrimp
Once your colony is stable and breeding, add a second tank to separate culls or to maintain a backup line. Only sell or share shrimp after at least one full generation in your water to ensure they are adapted. Transport them in clean, oxygenated water with a bit of moss for grip, and insulate in cold or hot weather.
Troubleshooting Checklist Before You Give Up
Confirm ammonia and nitrite are zero. Confirm nitrate under 20 ppm. Confirm GH, KH, and TDS are steady week to week. Slow down feeding and increase plant mass if algae is heavy. Add more moss for babies. Reduce handling of berried females. Ensure intake guards are in place. Match temperature on every water change. If you fix these points, breeding almost always resumes.
Conclusion
Successful cherry shrimp breeding is not about chasing perfect numbers or using expensive products. It is about stable water, mature biofilm, safe filtration, and consistent routine. Start with a 10 gallon tank, cycle patiently, plant heavily with mosses, and keep the environment calm. Feed lightly but regularly, protect babies with cover, and avoid predators. Keep your hands out of the tank unless you have a reason to intervene. Within a few months, you will see a steady stream of shrimplets, and the colony will grow into a colorful, self sustaining display. Follow the steps in this guide, stay consistent, and your shrimp will do the rest.