We are reader supported. When you purchase through links on our site, we may earn an affiliate commission. Also, as an Amazon affiliate, we earn from qualifying purchases.
Cyanobacteria blooms spread fast, smell bad, and can smother your aquascape. They ruin photos, weaken plants and corals, and stress fish by lowering oxygen. The good news is you can remove and prevent them with clear steps. This guide explains what cyanobacteria are, why they take over, how to fix the root causes, and how to keep your tank stable for the long term.
Introduction
Cyanobacteria are photosynthetic bacteria often called blue green algae. They form slimy sheets that coat sand, rocks, glass, and plants. Colors range from dark green to teal, brown, maroon, or even black. They can create bubbles during the day and smell earthy or musty. A bloom often starts in low flow areas and then spreads across the tank.
Many aquarists try to scrub it off and change water once, then see it return within days. That happens because the root cause remains. The key is to remove it physically, correct water quality and flow, tune lighting, and keep a stable maintenance routine. If you follow a plan for two to four weeks, you can clear it and stop it from coming back.
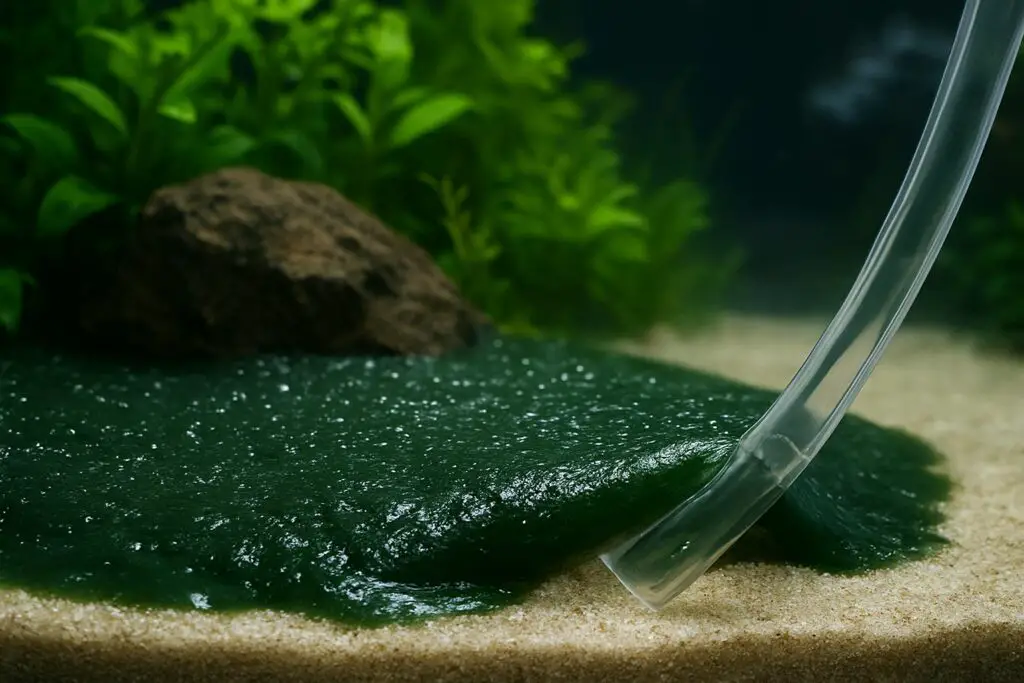
How to Identify Cyanobacteria
Visual Clues You Can Trust
Cyanobacteria look like a smooth, slimy film that peels off in sheets. It often forms continuous mats over substrate and decor. It is not fuzzy or stringy. During the day, small oxygen bubbles may collect on the surface of the mat.
The color can be dark green, blue green, reddish brown, or even purple. In many freshwater tanks it appears deep green. In some saltwater and high light systems it can look red or maroon.
Texture and Smell
If you gently lift a corner with a toothbrush or credit card, it comes up as a single skin. It feels slick and gelatinous. Many aquarists notice a musty smell on removal. This is a strong sign you are dealing with cyanobacteria and not typical algae.
How It Differs From Common Algae
Hair algae is stringy, looks like threads, and does not peel off as a sheet. Diatoms are dusty and wipe away like brown powder without holding together. Green spot algae is hard and sticks tightly to glass as small dots. Cyanobacteria is smooth, cohesive, and often forms bubbles during the light period.
Why Cyanobacteria Blooms Happen
Imbalance, Not Just Dirt
Cyanobacteria bloom when nutrients, light, and flow fall out of balance. It can thrive even in tanks that look clean. It often appears when nitrate is very low but phosphate and dissolved organics are available. This mismatch favors cyanobacteria over plants and common algae.
Excess Nutrients From Hidden Sources
Overfeeding, decaying plant leaves, trapped detritus in the substrate, and dirty filter media release phosphate and dissolved organic carbon. Uneaten food and fish waste collect in low flow pockets and under hardscape. Old filter sponges become nutrient factories if not rinsed regularly.
Weak Flow and Dead Spots
Cyanobacteria loves stagnant zones. Behind rocks, at substrate corners, and under driftwood it gains a foothold. Poor surface agitation also reduces gas exchange, which lowers oxygen and gives cyanobacteria an edge. Balanced circulation breaks up the mats and keeps nutrients moving to the filter.
Light Schedule and Sunlight Leaks
Overlong photoperiods, very intense light close to the water, and direct sunlight from a window push blooms. Old or shifted spectrum bulbs can make it worse. Aim for a controlled, consistent light period without sunlight leaks.
New Tank Instability
New tanks pass through stages while the biofilter matures. During this time, nitrate may be low while organics remain high. Cyanobacteria often appears in the first three months if maintenance and feeding are not balanced.
Source Water Issues
Some tap water contains measurable phosphate or silicate. This gives cyanobacteria what it needs at every water change. If your local supply is variable, consider RO or RO DI water and remineralize as needed.
Testing and Verifying the Problem
Parameters to Check
Test nitrate, phosphate, pH, KH, and temperature. If possible, check TDS in freshwater. In saltwater, also confirm salinity is stable. Record readings before and after maintenance so you can track improvement.
Common bloom pattern in many tanks is very low nitrate and measurable phosphate. Plants and algae stall without nitrate, while cyanobacteria keeps going. Do not chase zero on every nutrient. You want stability within a healthy range.
Test Your Source Water
Measure phosphate and nitrate in your tap or base water. If phosphate is present in source water and your tank runs low flow or high organics, blooms return easily. Switching to RO or RO DI, or using specific phosphate removal media, can help in stubborn cases.
Immediate Control Actions
Manual Removal First
Siphon out as much cyanobacteria as you can. Use a narrow hose to lift the sheet off surfaces and pull it out of the tank. On sand, hover the siphon just above the surface and slide to peel up the mat. Rinse filter pads in old tank water so they do not clog after heavy cleaning.
Large but Safe Water Change
Perform a 30 to 50 percent water change with temperature matched, dechlorinated water. This reduces dissolved organics and phosphate. In stubborn cases, use RO or RO DI water for changes until the bloom breaks.
Increase Aeration and Flow
Point a powerhead across the front of the glass or along the substrate to break dead spots. Add an airstone or raise surface agitation to improve oxygen. Cyanobacteria mats hold detritus and degrade oxygen at night. Good gas exchange supports fish and beneficial bacteria.
Reduce Feeding and Clean Up
Feed less for the next two weeks. Aim for food that is fully consumed within a minute. Remove decaying leaves and trim plants. Clean prefilters, sponges, and floss so the filter breathes freely.
Shorten the Photoperiod
Run 6 hours of light for one week. If the tank is heavily stocked with plants, you can step up to 7 to 8 hours after the bloom weakens. Avoid direct sunlight and light leaks from nearby windows.
The 2 to 4 Week Plan That Works
Week 1
Day 1, siphon out visible mats. Clean the substrate surface, trim decaying plant leaves, and rinse filter media in removed tank water. Do a 30 to 50 percent water change with conditioned water. Increase flow and aeration. Set lights to 6 hours. Reduce feeding by half. Test nitrate and phosphate and record values.
Day 3 or 4, siphon any new patches and change 20 to 30 percent of water. Keep flow high and surface well agitated. Do not overclean every surface. Keep biofilter sponges in place, only rinse gently if flow is restricted.
Week 2
Repeat manual removal and a 20 to 30 percent water change. Maintain 6 hours of light. Adjust pump angles to remove any new dead spots. Rinse mechanical media again if it caught large amounts of debris. Test nitrate and phosphate. You want stable readings, not zeros across the board.
Week 3
If bloom is fading, extend light to 7 hours. Resume a slightly larger feeding only if fish look thin. Keep up substrate cleaning, but avoid deep disturbing of planted root zones in one session. If the bloom persists in the same places, increase targeted flow to those spots.
Week 4
By now, most tanks show clear improvement. Restore routine feeding, but do not overfeed. Set a steady light period between 7 and 8 hours. Continue weekly maintenance with substrate siphon, filter floss change or rinse, and a 25 to 35 percent water change.
Optional Blackout for Stubborn Blooms
How to Do It Safely
After a major siphon and water change, cover the tank to block light for 48 to 72 hours. Keep filtration and aeration strong. Do not feed during blackout. Uncover, siphon dead mats, and perform a 30 to 50 percent water change. Restore a 6 hour light schedule and continue the weekly plan.
Blackout is a tool, not a cure by itself. It works best when paired with nutrient control, flow correction, and maintenance.
Chemical Treatments Explained
Antibiotics as a Last Resort
Products based on erythromycin or similar actives can knock back cyanobacteria fast. Use them only after you correct feeding, flow, and light. These treatments can lower oxygen and may hit parts of your biofilter. Run strong aeration, watch fish closely, and test ammonia and nitrite during and after use.
Follow the product directions exactly. When the course is done, perform a large water change and run fresh activated carbon to remove residues. Keep up manual removal and normal maintenance to prevent a rebound.
Oxidizers and Other Spot Treatments
Some aquarists spot treat with hydrogen peroxide during manual removal. This can damage sensitive livestock if misused. If you choose to use any oxidizer, apply it carefully, increase aeration, and test water after treatment. Always address the root causes or the bloom returns.
Long Term Prevention
Feeding and Stocking
Feed only what fish or invertebrates finish in about a minute. Rotate foods to reduce waste. Avoid overstocking. A heavy bioload makes nutrient control harder and raises the risk of dead spots.
Filter Care and Flow
Rinse sponges and mechanical media weekly in removed tank water. Replace floss often so it does not decay in the filter. Keep return nozzles and powerheads aimed to sweep across the substrate and behind hardscape. Ensure steady surface movement for oxygen.
Lighting Discipline
Use a timer and keep a consistent light period. In most community and planted tanks, 7 to 8 hours is enough. Avoid direct sunlight. Replace old bulbs on schedule, and avoid placing high output fixtures too close to the water if you cannot balance nutrients.
Substrate and Aquascape Hygiene
During weekly water changes, siphon the top layer of substrate to remove trapped detritus. In sand, lift mats without digging too deep each time. Thin dense stem plant clusters and trim leaves near the substrate to improve flow.
Source Water and Media Choices
If your tap water carries phosphate, consider RO or RO DI water and remineralize as needed. Phosphate absorbing media can help when used correctly, but do not strip nutrients to zero. Aim for balanced, stable levels that support plants and biofilter without feeding cyanobacteria.
Special Notes for Different Setups
New Tanks
In new systems, expect some instability. Keep feeding very modest, change water weekly, and resist the urge to overhaul everything at once. Stability and time allow the biofilter and competing microbes to establish.
Heavily Planted Tanks
Cyanobacteria often appears when nitrate is near zero but phosphate and organics remain. Keep a balanced nutrient plan so plants grow and outcompete cyanobacteria. Do not chase zero on phosphate. Focus on steady CO2 where used, clean filters, and consistent trimming.
Marine and Reef Systems
In ultra low nutrient saltwater tanks, cyanobacteria can thrive where nitrate is very low and phosphate is not. Improve export of organics through skimming, mechanical filtration, and stable refugium lighting. Increase random flow and keep surfaces clear of detritus.
Common Myths and Mistakes
Myth One: Algae Eaters Will Fix It
Most algae eaters will not eat cyanobacteria mats. Even if they nibble, they cannot keep up with a bloom. Manual removal and root cause fixes are required.
Myth Two: Darkness Alone Cures It
A blackout without cleanup and maintenance hides the symptom for a few days. If you do not correct nutrients and flow, the bloom returns.
Mistake: Chasing Zero Nutrients
Setting nitrate and phosphate to absolute zero stresses plants and beneficial microbes. Cyanobacteria can still find a way through organics and other pathways. Aim for balanced, not empty.
Troubleshooting Checklist
When the Bloom Will Not Quit
Confirm you are dealing with cyanobacteria and not hair algae or diatoms. Siphon mats, clean mechanical media, and change 30 to 50 percent of the water. Cut feeding, set light to 6 hours for a week, and increase flow and aeration. Test nitrate and phosphate and check your source water. Consider a 48 to 72 hour blackout after a major clean. Use antibiotics only after these steps, with strong aeration and close monitoring.
A Simple Weekly Routine That Prevents Blooms
Maintenance You Can Stick To
Once a week, siphon the substrate surface where debris collects. Trim and remove decaying plant parts. Rinse or replace mechanical media. Change 25 to 35 percent of the water with dechlorinated, temperature matched water. Keep the light period between 7 and 8 hours and confirm your timer schedule. Feed modestly and watch fish behavior rather than the clock or habit.
Conclusion
Cyanobacteria blooms are disruptive, but they are not mysterious. They result from an imbalance of nutrients, light, and flow, often with trapped organics and weak aeration. The fix is clear. Remove the mats, lower organics with water changes, improve flow and oxygen, shorten the photoperiod, and keep a steady routine for two to four weeks. Use blackout as a helper and antibiotics only as a last resort with care. Once balance returns, your tank stays clear and stable with simple weekly habits.
FAQ
Q: How do I tell cyanobacteria from algae
A: Cyanobacteria forms smooth, slimy sheets that peel off in one piece, often with daytime bubbles and a musty smell. Hair algae is stringy and does not peel as a sheet, while diatoms are dusty and wipe away like brown powder.
Q: What is the fastest way to stop a cyanobacteria bloom
A: Siphon out the mats, do a 30 to 50 percent water change with conditioned water, cut feeding by half, set lights to 6 hours for a week, increase flow and surface agitation, and rinse mechanical filter media so the filter breathes freely.
Q: Should I use antibiotics to remove cyanobacteria in my aquarium
A: Use them only after you fix feeding, flow, and light, because antibiotics can lower oxygen and may affect your biofilter. If you choose to use one, run strong aeration, monitor ammonia and nitrite, follow product directions, and do a large water change with fresh carbon at the end.
Q: Why does cyanobacteria appear when nitrate is low
A: Many cyanobacteria thrive when nitrate is very low but phosphate and dissolved organics are available, so the imbalance favors them over plants and common algae.
Q: How long does it take to clear a cyanobacteria bloom
A: With consistent manual removal, water changes, improved flow and aeration, and a shorter photoperiod, most tanks clear in two to four weeks.