We are reader supported. When you purchase through links on our site, we may earn an affiliate commission. Also, as an Amazon affiliate, we earn from qualifying purchases.
Cyanobacteria blooms can take over a tank fast. The good news is that you can clear them and keep them away with a clear plan. This guide explains what cyanobacteria are, why they appear, how to stop a bloom safely, and how to prevent it long term. The steps are simple, beginner friendly, and work in both freshwater and saltwater systems.
Introduction
Cyanobacteria, often called blue green algae, form slimy sheets that spread over substrate, glass, plants, rocks, and corals. They can smother life, trap detritus, and ruin the look of your aquarium. Many aquarists fight them at some point. You do not need to tear down your tank. You need to remove what feeds them and stabilize your system. Start with identification, then act fast with practical steps that protect your fish, plants, and bacteria.
What Cyanobacteria Are and Are Not
Cyanobacteria in simple terms
Cyanobacteria are photosynthetic bacteria, not true algae. They use light and nutrients to grow, and they form thin, often slimy mats. They can be green, blue green, red, or even black. They trap air bubbles during the day and peel off in sheets when disturbed.
How to recognize a bloom
Look for a soft, slippery film that spreads across surfaces within days. It often has an earthy or musty smell. It peels off in one piece more than true algae, which tends to be more fibrous. If you see fast daily growth and bubbles stuck under a sheet, you are likely dealing with cyanobacteria.
Why Blooms Happen
Light and nutrient imbalance
Strong or long lighting with excess nutrients fuels blooms. Direct sunlight, lights on for more than eight to nine hours, and old bulbs with shifted spectrum can all push growth. Unbalanced nutrients also help. Very low nitrate with available phosphate can favor cyanobacteria, and so can high dissolved organics from waste and uneaten food.
Low flow and dead spots
Stagnant areas allow detritus to build up and give cyanobacteria a place to anchor. Low flow often shows up as mats in corners, behind hardscape, or along the sand in areas with little circulation. In saltwater tanks, low flow on the sand bed is a common trigger.
Organic load and maintenance gaps
Overfeeding, infrequent gravel vacuuming, dirty filter media, and decaying plant leaves or uneaten food all add organics. Cyanobacteria grow well in nutrient rich slime. If waste builds up faster than you export it, a bloom is likely.
Source water quality
Tap water can bring in phosphate, nitrate, and silicate. If your source water is nutrient rich, every water change can feed the bloom unless you treat or filter the water first.
New or unstable tanks
New tanks and tanks after big changes can have unstable bacteria populations and fluctuating nutrients. Instability often produces small cyanobacteria patches that spread if not addressed.
Quick Diagnosis Checklist
Confirm it is cyanobacteria
It is likely cyanobacteria if it forms slimy sheets that peel, grows fast day to day, traps bubbles under the mat, and has an earthy smell. Filamentous strands that do not peel and feel rough are usually algae, not cyanobacteria.
Check lighting and flow
Count photoperiod hours and look for direct sunlight. Watch where food settles and note any still corners. If a leaf or pellet sits unmoved, you have low flow.
Test water and look for waste
Test ammonia, nitrite, nitrate, and phosphate. Ammonia and nitrite should be zero. Nitrate in the range of 5 to 20 ppm with low to moderate phosphate is a healthy target for most community tanks. Look for decaying matter on the substrate and inside the filter.
Immediate Actions to Slow the Bloom
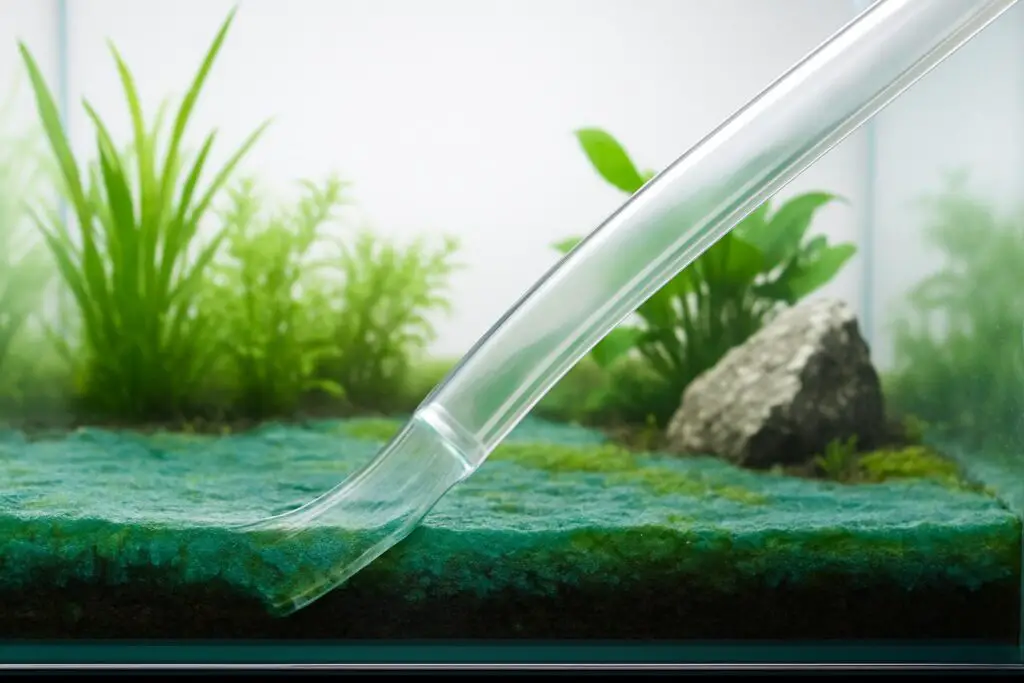
Manual removal and siphoning
Start by peeling and siphoning out as much as you can. Use a small diameter hose and skim the surface of the mats. Remove what you see. The more you remove now, the faster the recovery.
Large water change
Do a 30 to 50 percent water change after the siphon. Match temperature and dechlorinate. This exports dissolved nutrients and spores.
Reduce light right away
Cut the photoperiod to six to seven hours for the next two weeks. Turn off any direct room light or sunlight. In planted tanks, this short period will not harm most plants if you keep CO2 and nutrients stable.
Increase flow and aeration
Point a filter outlet or powerhead to move water across the affected area. Add an airstone to boost oxygen. Good flow makes it harder for cyanobacteria to settle and helps your biofilter.
The Blackout Method That Works
When to use a blackout
Use a blackout when mats keep returning after manual removal or when you want a quick reset without chemicals. A proper blackout starves cyanobacteria of light while you control nutrients.
Step by step blackout plan
Before blackout day, siphon out as much as possible and do a 30 to 50 percent water change. Clean the filter sponge or prefilter in tank water to restore flow. Add an airstone for strong aeration. Then cover the tank completely so no light gets in. Leave it covered for three full days. Do not feed during blackout. Keep filters and air running as normal. On day four, uncover the tank, manually remove remaining patches, and do another 30 to 50 percent water change. Resume a six to seven hour photoperiod. Repeat light manual removal over the next week if needed.
Safety notes for blackout
Ensure strong aeration during blackout. Plants and photosynthetic organisms use oxygen in the dark. Fish need stable oxygen. Do not dose any medication during blackout unless a manufacturer specifically supports that use.
Balance Nutrients Instead of Chasing Zero
Keep nitrate and phosphate in range
Do not aim for zero nutrients. Most community tanks do best with nitrate between 5 and 20 ppm and measurable but controlled phosphate. In planted tanks, very low nitrate can invite cyanobacteria even when phosphate is low. Keep both nutrients available to plants while preventing excess by controlling feeding and waste.
Smart feeding
Feed small portions your fish finish within one to two minutes. Reduce high phosphate foods and overuse of frozen foods that add juices to the water. Rinse frozen foods in tank water in a net before feeding to reduce added nutrients.
Support plant growth in freshwater
Healthy plants outcompete cyanobacteria for nutrients. Keep a steady fertilization routine, maintain stable CO2 if you use it, and prune dying leaves. Erratic CO2 and irregular dosing can cause swings that favor cyanobacteria.
Filtration and Equipment Tuning
Keep filters clean but seeded
Rinse mechanical sponges or floss weekly in removed tank water. Do not replace all media at once. Keep biological media intact so your bacteria continue to remove ammonia and nitrite. Strong, consistent filtration stabilizes the tank and lowers organics.
Use targeted media as needed
Activated carbon removes dissolved organics that feed blooms. Phosphate absorbers help when source water or food pushes phosphate high. Replace media on schedule so it remains effective.
Improve circulation
Add or reposition a powerhead to remove dead spots. Aim for gentle, broad flow that keeps debris suspended long enough to be collected by the filter.
Source Water Upgrades
Test your tap
Check nitrate and phosphate in your tap water. If they read high, you bring nutrients into the tank with every change.
Switch or treat if needed
If your source water is the problem, consider RO or RO DI water re mineralized for your livestock, or use water conditioners and media that reduce phosphate. Consistent, low nutrient change water helps prevent rebounds.
Spot Treatments and Medications
Non antibiotic approaches first
Manual removal, blackout, improved flow, better maintenance, and nutrient balance solve most cases. These steps are safe for fish, inverts, and plants when done correctly.
Oxidizer spot treatments
Some aquarists use hydrogen peroxide spot treatments on visible mats. Apply with care, target only the mats, and ensure good aeration. Sensitive livestock may react. Use this as a helper, not as a replacement for fixing the cause.
Antibiotics as a last resort
Use antibiotics only when other methods fail and the bloom threatens livestock. Antibiotics can harm beneficial bacteria and can cause oxygen drops as cyanobacteria die. If you choose a product, follow the manufacturer instructions exactly, run strong aeration, and perform large water changes and carbon after treatment. Be ready to rebuild the biofilter if needed.
Lighting Management
Control the photoperiod
Keep lights at six to eight hours daily during recovery, and eight to nine hours long term for most setups. Use a timer to prevent creep.
Avoid direct sunlight and old bulbs
Block window light. Replace old fluorescent bulbs that have shifted spectrum. Modern LEDs with a set schedule make control easier.
Weekly Maintenance That Prevents Blooms
Simple routine to follow
Once a week, siphon detritus from the substrate, clean prefilters and sponges in tank water, trim dead leaves, wipe glass, and perform a 30 percent water change. Keep feeding steady and moderate. Check flow and adjust outlets as plants grow and scape changes.
Stable biology
Avoid large, sudden changes. Do not replace all media or overhaul the filter in one sitting. Stability prevents swings that cyanobacteria can exploit.
Quarantine and pre clean new additions
Rinse new plants and decor to remove slime and debris. Quarantine if possible to reduce the chance of importing problems.
Troubleshooting Common Scenarios
Planted tank with very low nitrate
If your planted tank shows zero nitrate and you see cyanobacteria, you may need to raise nitrate into a healthy range while keeping phosphate available but controlled. Improve CO2 stability, keep a steady fertilization routine, and shorten light during recovery.
High phosphate from food
If phosphate stays high even after water changes, review feeding and food types. Rinse frozen foods, reduce portions, add a phosphate absorber, and increase export by cleaning filter media and siphoning more detritus.
Sand bed with red slime in saltwater
Increase flow across the sand, siphon the top layer during water changes, wet skim with a protein skimmer to export organics, reduce broadcast feeding, and consider a temporary blackout paired with improved filtration. Keep alkalinity, nutrient levels, and lighting stable.
A Practical 14 Day Recovery Plan
Days 1 to 3
Manually remove as much as possible. Do a 30 to 50 percent water change. Clean mechanical media in tank water. Reduce light to six to seven hours. Increase aeration and flow into dead spots. Feed lightly.
Days 4 to 6
Perform a full blackout for three days if the bloom remains strong. Keep filters and air on. Do not feed. On day 7, uncover, remove remaining patches, and change 30 to 50 percent of the water.
Days 7 to 10
Hold the short photoperiod. Maintain strong flow. Siphon any new patches as soon as they appear. Replace or recharge chemical media like carbon or phosphate absorber if used.
Days 11 to 14
Resume normal feeding at reduced portions. Keep weekly maintenance. Verify nitrate sits between 5 and 20 ppm and phosphate is measurable but controlled. Extend light to eight hours only if the tank remains clear.
Common Mistakes to Avoid
Chasing zero nutrients
Zero nitrate with available phosphate invites instability. Keep nutrients balanced rather than stripped.
Overcleaning the biofilter
Replacing all media or washing bacteria rich media in tap water can crash your cycle and worsen blooms. Rinse gently in tank water and stagger changes.
Long photoperiods during recovery
Ten to twelve hour lighting during a bloom makes recovery slow. Keep it short until the tank is stable.
Ignoring flow
Leaving dead spots untouched lets mats re form in the same places. Adjust outlets and add mild circulation where needed.
Signs You Are Winning
What improvement looks like
Daily growth slows, mats stop trapping bubbles, colors fade from deep green or red to dull patches, and new mats fail to form after you siphon. Water looks clearer, fish are more active, and plants show new growth.
Conclusion
Cyanobacteria blooms thrive on excess light, poor flow, and accumulated nutrients. Remove the mats, starve them of light with a short blackout if needed, increase aeration and circulation, export waste with strong maintenance, and keep nutrients balanced. Stabilize your routine and the bloom will fade. Keep the same discipline and it will not return.
FAQ
Q: What is the fastest way to stop a cyanobacteria bloom
A: Manually siphon out as much as possible, do a 30 to 50 percent water change, cut the photoperiod to six to seven hours, and increase flow and aeration. If the bloom persists, apply a three day blackout with strong aeration and another large water change after.
Q: How long should a blackout last
A: Leave the tank covered for three full days with filters and air running, then uncover on day four, remove remaining patches, and change 30 to 50 percent of the water.
Q: Do I need to remove all cyanobacteria manually
A: Remove as much as you can because this speeds recovery, but you do not need to get every last patch before a blackout and nutrient balance do the rest.
Q: What nitrate and phosphate levels help prevent cyanobacteria
A: Most community tanks do best with nitrate between 5 and 20 ppm and measurable but controlled phosphate, paired with regular maintenance and good flow.
Q: Is antibiotic treatment safe for fish and beneficial bacteria
A: Use antibiotics only when other methods fail because they can harm beneficial bacteria and can cause oxygen drops as cyanobacteria die, and if you choose a product, follow the manufacturer instructions exactly, run strong aeration, and perform large water changes and carbon after treatment.