We are reader supported. When you purchase through links on our site, we may earn an affiliate commission. Also, as an Amazon affiliate, we earn from qualifying purchases.
Betta breeding is achievable at home when you plan every step and keep the process simple. This guide walks you through selecting a healthy pair, building a proper breeding setup, managing spawning, and raising fry with clear routines. Follow each stage in order. Keep notes. Do not rush. Small, consistent actions decide the outcome.
Introduction
Your goal is predictable, healthy spawns with minimal losses. That means controlled water parameters, a calm environment, well conditioned breeders, and a feeding plan for fry ready before eggs hatch. You will set the stage, let the fish do their job, and then protect the eggs and fry from stress. Read through once, prepare your gear and foods, then begin.
Core Principles for Success
Four principles guide every decision. Choose the right breeders. Provide a low stress environment. Feed appropriately for each phase. Maintain stable water conditions. If something goes wrong, check these pillars first.
Choose the Right Breeders
Age and Health
Pick a male and female between 4 and 10 months old for best fertility. They should be active, with full fins, clear eyes, and no signs of disease. Avoid fish with chronic fin rot, pineconing, or lethargy. A sleek body and steady appetite are positive signs.
Temperament and Form
Choose a male that flares confidently but does not stay in a frantic state for long. The female should be alert, not overly timid, and able to show vertical barring when ready. Color and fin type are your choice, but start with hardy, common strains before moving to delicate lines.
Pre Spawning Conditioning
Condition both fish for 10 to 14 days. Feed 2 to 3 times daily with high quality foods such as live or frozen baby brine shrimp, daphnia, blackworms, or mosquito larvae where legal. Supplement with quality pellets. Keep water clean and warm at 26 to 28 C. The goal is strong energy reserves and egg development.
Set Up the Breeding Tank Correctly
Tank Size and Layout
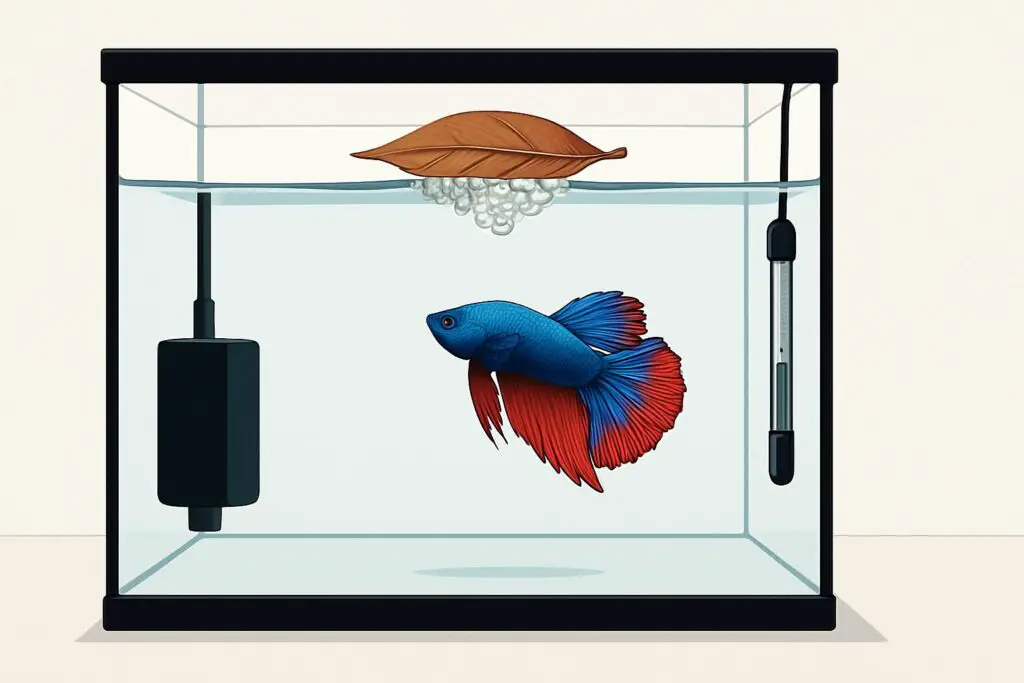
Use a bare bottom tank of 10 to 20 liters for a single pair. Keep the water depth shallow, about 10 to 15 cm. Add a snug lid to prevent heat loss and provide humid air for bubble nest stability. Place a floating anchor for the nest, such as a piece of Indian almond leaf or a foam cup half.
Water Parameters
Target temperature 26 to 28 C. pH between 6.0 and 7.2. General hardness 3 to 8 dGH. Carbonate hardness 1 to 5 dKH. Use gentle tannins from Indian almond leaf to reduce stress and support egg health. Pre condition water for at least 24 hours with dechlorinator. If your tap water is very hard, consider blending with RO water to reach the target range while maintaining some KH for stability.
Filtration and Aeration
Use an air driven sponge filter set to a very low flow. During courtship and while eggs are in the nest, turn the air off or as low as possible so the nest is not disturbed. Avoid power filters and strong currents.
Lighting and Lid
Provide dim to moderate light. Strong light increases stress. A tight lid is essential to keep warm, moist air above the surface, which helps nest maintenance and later aids labyrinth organ development in fry.
Equipment Checklist
Breeding tank 10 to 20 liters. Sponge filter with air valve and pump. Heater with a thermometer. Indian almond leaf. Floating nest anchor. Clear divider or chimney for introductions. Siphon hose for fry safe water changes. Live food cultures or reliable sources. Backup tank for separating fish post spawn.
Trigger and Timing
Introduce the Pair Safely
Place the male in the breeding tank first. Let him settle for 24 hours. Add the female in a clear container inside the tank or behind a transparent divider. This allows the male to display and start a nest without risking injury to the female.
Signs the Male Is Ready
The male flares at the female, patrols the surface, and builds a bubble nest under a leaf or cup. The nest should have persistent foam clusters that he tends regularly.
Signs the Female Is Ready
The female shows vertical barring on her body, a plump belly, and a forward posture toward the male. She may respond calmly to his displays without frantic fleeing.
When to Release the Female
Release the female only when the male has an established nest and the female shows readiness signs. Choose a time when you can observe, ideally in the morning. If aggression is intense for more than 15 to 20 minutes without courtship embraces, re separate and try again later.
Spawning Day Management
What Normal Looks Like
After some chasing and displaying, the pair will meet under the nest. The male wraps around the female in a gentle embrace. Eggs are released and fertilized. The male collects eggs and places them in the nest. This repeats in rounds for 1 to 2 hours until the female has no more eggs.
Handling Aggression
Short chasing and light nipping can be normal. Intervene if the female hides continuously and shows torn fins or if the male relentlessly attacks without nest activity. Use a divider to rest them and retry another day.
After Spawning Steps
Once spawning ends, remove the female carefully. Leave the male with the nest. Keep the room quiet. Maintain temperature and low water movement. Do not feed the male heavily now. A very small snack may be offered but is not required. Many males will refuse food during egg tending.
Egg and Nest Care
Protect the Nest
Keep the lid tight and air flow minimal to prevent nest breakup. Avoid moving the tank or tapping the glass. Indian almond leaf tannins can help reduce fungal issues naturally. Clean water and stable warmth remain the best protection for eggs.
Hatching Timeline
At 26 to 28 C, eggs usually hatch in 24 to 36 hours. Fry will hang tail down from the nest while the male retrieves any that fall. After another 24 to 48 hours, the fry become free swimming and start leaving the nest area. This is your cue to remove the male.
Fry Care From Day 0 to Week 6
Day 0 to Day 2 Post Hatch
Do not feed. Fry absorb yolk sacs. Keep filtration off or at the lowest setting. Maintain 26 to 28 C and a tight lid.
Free Swimming to Week 1
When most fry leave the nest and swim horizontally, remove the male gently. Begin first foods that match fry mouth size. Best starters include infusoria, vinegar eels, and paramecium. If you do not have live cultures, use commercial liquid fry foods formulated for egg layers, but live foods usually yield stronger survival. Feed tiny portions 3 to 5 times per day. The water should not become cloudy.
Week 2 to Week 3
Introduce newly hatched baby brine shrimp and microworms. These foods fit fry mouth size and drive faster growth. Continue multiple small feedings daily. Start gentle, frequent water changes to maintain excellent quality.
Week 4 to Week 6
Increase tank volume gradually or move fry to a larger grow out tank. Begin transitioning to larger foods such as crushed high quality pellets and thawed small frozen foods. Keep the lid tight to protect developing labyrinth organs. Separate aggressive or much larger fry to reduce injuries and improve growth uniformity.
Feeding Schedule and Quantities
Small and Frequent
Feed tiny amounts multiple times per day. Aim for food to be consumed within a few minutes. Overfeeding causes bacterial blooms that kill fry. Underfeeding stunts growth and increases losses.
Culture Preparation
Start infusoria, vinegar eel, or microworm cultures at least one week before breeding. Keep backup cultures to prevent supply gaps. Hatch baby brine shrimp daily once fry are large enough, usually from day 3 to day 5 of free swimming onward.
Water Quality Management
Gentle Routine
Begin water changes once fry are free swimming and feeding. Start with 5 to 10 percent daily or every other day. As feeding increases, move to 20 to 30 percent spread across several small changes per week. Always match temperature and pH closely.
Siphon Technique
Use a thin air line siphon with a sponge or mesh over the intake to avoid sucking fry. Siphon from the bare bottom to remove waste and uneaten food. Refill slowly to avoid disturbing fry.
Dechlorination and Stability
Always treat new water with dechlorinator. Match temperature within 1 C. Keep pH stable within about 0.2 between changes. Avoid large swings in hardness. If using RO blends, mix consistently and test before adding.
Behavior and Health Monitoring
Daily Checks
Observe fry at feeding times. Look for steady activity, full bellies without bloating, and clear eyes. Remove any dead fry promptly. Note any gasping or surface clumping, which may indicate poor oxygen or water quality.
Growth Tracking
Healthy fry show visible size increases each week with good feeding. If most fry lag, increase live food quality and water change frequency. If only a few are extremely large, consider splitting the group to reduce competition.
Troubleshooting Common Problems
Male Not Building a Nest
Check temperature and reduce flow to near zero. Add Indian almond leaf for tannins and surface calm. Ensure the female is visible but separated. Try a foam cup half as a nest anchor. Re condition the pair if needed for another week.
Pair Fights Excessively
Use a divider to allow more time for display without contact. Verify the female is ready with vertical barring and rounded belly. Try a larger breeding tank or add more hiding spots like clumps of java moss. If aggression persists, choose a calmer pair.
Eggs Not Hatching
Causes include infertile eggs, temperature below 26 C, or strong current breaking the nest. Verify that the male embraced the female properly. Keep air off and lid sealed. Maintain stable warmth. Use Indian almond leaf tannins to discourage fungus.
Fry Die After a Few Days
Likely issues include poor first foods, overfeeding leading to bad water, or missed water changes. Begin with infusoria and vinegar eels, then add baby brine shrimp as soon as fry can take them. Increase small, frequent water changes and reduce waste.
Slow Growth
Improve food quality and frequency. Ensure temperature stays in the 26 to 28 C range. Increase partial water changes. Reduce crowding by moving part of the group to a second tank.
Scaling Up Responsibly
Plan for Numbers
A single spawn can produce dozens to over a hundred fry. Prepare enough tank space, heaters, and filters for grow out and for separating males later. Crowding leads to stunting and aggression.
Ethics and Rehoming
Breed only when you have a plan for rehoming. Keep records of parent traits and health. Prioritize strong, healthy fish over unusual colors or fin types. Do not release fish into local waterways.
Essential Supplies Summary
Breeding tank 10 to 20 liters with tight lid. Adjustable heater and thermometer. Air pump, valve, and sponge filter. Divider or chimney for introductions. Indian almond leaves. Floating nest anchor. Fine siphon and bucket dedicated to the tank. Live food cultures including infusoria, vinegar eels, microworms, and baby brine shrimp setup. Water test kit for pH, GH, KH, and thermometer. Dechlorinator. Backup tanks for separation.
Step by Step Checklist
Before Breeding
Condition male and female for 10 to 14 days. Prepare breeding tank, heater, and sponge filter. Add Indian almond leaf and nest anchor. Start live food cultures. Blend and test water to target parameters.
During Introduction
Place male in tank for 24 hours. Add female behind a divider or in a clear container. Wait for nest building and readiness signs. Release female when both show clear readiness.
During Spawning
Observe quietly. Intervene if there is severe injury risk. Remove the female after spawning ends. Leave the male to tend eggs.
After Hatching
Do not feed until free swimming. Begin starter foods and tiny water changes. Remove the male when fry are free swimming. Keep feeding small and frequent. Increase water changes as feeding increases.
Grow Out
Introduce baby brine shrimp and microworms. Expand space as fry grow. Keep the lid tight. Sort and separate as needed. Transition to larger foods by week 4 to week 6.
Conclusion
Breeding bettas at home is a controlled process built on preparation and restraint. Select strong breeders, stabilize the environment, and feed each life stage correctly. Keep water changes gentle and frequent. Observe daily and adjust based on behavior and growth. By following this plan, you reduce losses, raise healthier fry, and gain repeatable results you can improve with each spawn.
FAQ
Q: What is the ideal breeding tank setup for betta fish
A: Use a 10 to 20 liter bare bottom tank with 10 to 15 cm water depth, a tight lid, a low flow sponge filter, a heater set to 26 to 28 C, Indian almond leaf for tannins, and a floating anchor for the bubble nest.
Q: When should I remove the female and the male
A: Remove the female right after spawning ends. Remove the male when most fry are free swimming and leaving the nest, usually 24 to 48 hours after hatching.
Q: What are the best first foods for betta fry
A: Start with infusoria, vinegar eels, or paramecium at free swimming, then add newly hatched baby brine shrimp and microworms as soon as fry can take them, typically from day 3 to day 5 of free swimming.
Q: How often should I change water in a fry tank
A: Begin with 5 to 10 percent daily or every other day once fry are feeding, then increase to 20 to 30 percent spread across several small changes per week as feeding volume rises, always matching temperature and pH.
Q: Why are my betta eggs not hatching
A: Common causes include low temperature below 26 C, strong current breaking the nest, infertile eggs, or unstable conditions. Keep water warm and still, use a tight lid, and add Indian almond leaf tannins to discourage fungus.