
We are reader supported. When you purchase through links on our site, we may earn an affiliate commission. Also, as an Amazon affiliate, we earn from qualifying purchases.
Shrimp thrive when they feel safe. Hiding spots reduce stress, improve molting success, protect babies, and grow a steady layer of biofilm that shrimp love to graze. The right hide can also stabilize your tank’s micro-ecosystem by offering surface area for beneficial bacteria. In this guide, you will learn how to choose dependable, shrimp-safe hides for 2026, how to place them for best results, and which four products stand out for different tank sizes and aquascapes. Each pick focuses on safety, utility, and long-term durability.
How to choose a shrimp hide in 2026
Material safety first
Stick to inert materials that do not alter water chemistry. Ceramic, natural coconut shells, and untreated hardwoods like cholla are safe choices. Avoid painted ornaments, sharp-edged decor, and low-fired clays that can soften or leach. If in doubt, rinse and soak, then test pH and TDS before use.
Surface texture and biofilm growth
Porous surfaces grow biofilm more quickly. Cholla wood and rough ceramic offer micro-texture shrimp can grip and graze. Smooth plastics lag behind for biofilm growth and are harder for tiny shrimplets to climb.
Openings and baby safety
Look for rounded edges and openings that are not tight traps. Multiple entry points help escape routes during molting. If holes are large, wrap with moss or place a fine-leaved plant nearby so babies have micro-cover.
Flow and placement fit
Hides work best in light to moderate flow. Too still and detritus builds; too strong and shrimp avoid them. Place hides away from filter intakes to prevent shrimplet loss and near grazing zones where biofilm is thick.
Maintenance load
Choose hides that you can easily lift and swish in old tank water during routine maintenance. Complex rock stacks and heavy resin ornaments trap waste. Light, modular hides make cleaning simpler and safer.
How many hides
Plan one medium hide per 5–10 gallons, then layer in micro-hides with plants and hardscape. In breeder tanks, add more cover density by mixing at least two hide types so shrimp of all sizes can find comfortable spots.
4 best shrimp hides for 2026
The list below covers ceramic, coconut, and natural wood options. Each has a different footprint and texture so you can match your shrimp species, aquascape style, and tank size.
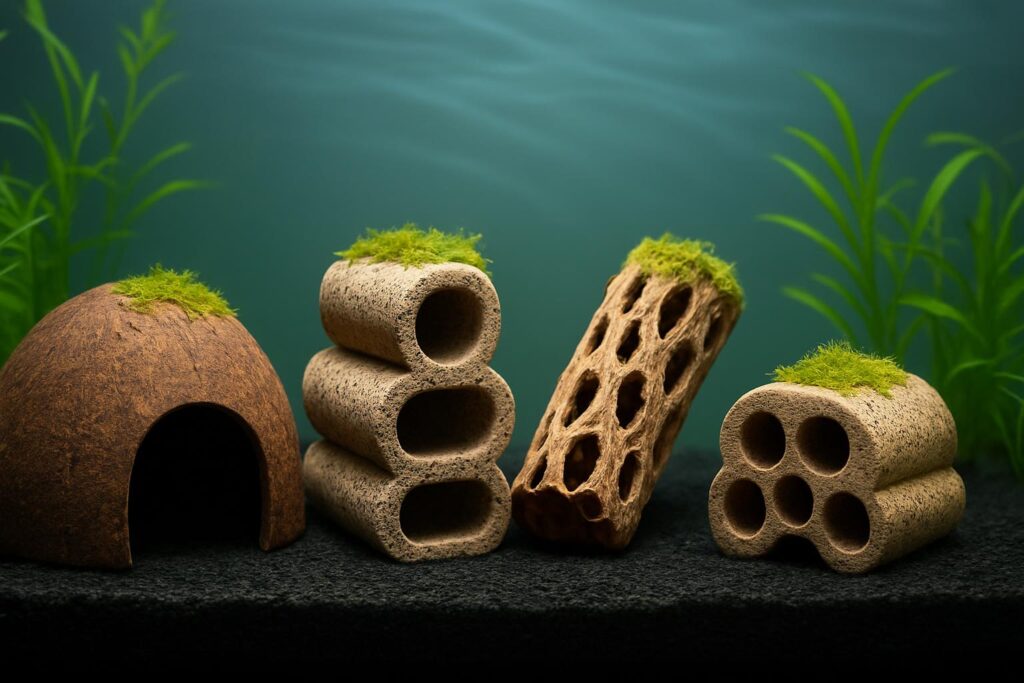
1) SunGrow Natural Coconut Shrimp Hut
This is a simple, reliable dome made from a real coconut shell with a smooth doorway. It offers shade, stable shelter for molting, and a textured surface that takes on biofilm quickly. The footprint stays compact, which helps in nano tanks. Coconut huts blend well into planted layouts and provide a safe retreat without blocking sightlines.
Why it helps: Hard, inert shell with a naturally rough surface. One wide opening offers easy access for adults while keeping a shaded interior. Coconut material encourages biofilm and moss growth. Shrimp settle inside during molts and use the rim as a grazing ring after feeding times.
Best for: Nano tanks and low-tech planted setups that need discreet shelter. Ideal for Neocaridina and Caridina that prefer shaded zones and consistent microbiofilm.
Key notes:
- Natural texture grows biofilm and hosts microfauna
- Low profile, stable on substrate
- Single entrance reduces chasing and stress in mixed tanks
Setup tips: Rinse and then soak in dechlorinated water for a few hours to release tannins and trapped dust. If you want extra micro-cover, tie a tufts of moss around the doorway with cotton thread. Place near plants and away from strong current, but not in a dead zone.
Potential downsides: Tannins can add a light tea tint at first. The single opening limits through-flow in very fine substrates; lift and swish during water changes to clear debris.
2) QANVEE Ceramic Shrimp House, 3-Layer Stack
This layered ceramic tunnel stack gives shrimp multiple entrances at different heights. The rough ceramic surface is ideal for biofilm and easy gripping. Stable and compact, it fits under driftwood or behind a stem-plant cluster without stealing open swimming space. The multi-portal design helps reduce territorial pressure and provides safe escape routes during molting.
Why it helps: Porous ceramic offers high surface area for beneficial bacteria and biofilm. Three levels allow shrimp to spread out, so less crowding and fewer stress spikes during feeding rushes. The structure provides shade and a consistent microclimate.
Best for: Community shrimp tanks from 10 to 30 gallons that need one robust shelter with multiple lanes. Works well in breeder setups where you want vertical cover without huge footprint.
Key notes:
- Modular look blends with hardscape lines
- Multiple entries reduce chasing and stacking stress
- Rough finish promotes fast grazing
Setup tips: Rinse and pre-soak in dechlorinated water to remove kiln dust. For shrimplet safety, add a thin moss layer along the sides or place a small pad of subwassertang on top. Position in moderate flow so light current passes through without blasting.
Potential downsides: The internal tunnels can collect mulm over time in low-flow corners. Swish gently in a bucket of tank water every 2–4 weeks to keep passages clean.
3) AQUANEAT Natural Cholla Wood Logs
Cholla wood is a classic for shrimp. It is a natural, lightweight cactus skeleton with a honeycomb of holes that create micro-caves for babies and grazing lanes for adults. Once seasoned, it grows a rich layer of biofilm and can host beneficial microorganisms that keep babies fed between meals. The logs are easy to tuck into scapes or link under a branch of driftwood.
Why it helps: Highly porous walls and many tiny hollows increase biofilm surface and provide micro-shelter for shrimplets. Cholla’s low density makes placement flexible, and it gradually softens at the surface, continually renewing its grazing texture.
Best for: Baby-heavy colonies and breeders aiming to boost early survival. Also great for soft-water Caridina that appreciate natural tannins and microfauna.
Key notes:
- Lightweight and easy to move for cleaning
- Excellent for attaching moss or bucephalandra
- Multiple small holes offer safe retreats for shrimplets
Setup tips: Boil for 10–20 minutes to remove trapped air, reduce tannins, and ensure it sinks. Rinse after boiling. Stack two logs slightly offset so holes do not line up, which increases complexity. Place near plants and away from direct filter intake.
Potential downsides: Releases tannins early on and can harbor detritus in still corners. Keep gentle flow passing across the log and swish during water changes. Replace if it becomes too soft after long-term use.
4) SLSON Ceramic Shrimp Cave, 7-Hole Tube
This ceramic cluster has multiple small entrances along a compact tube. It is purpose-built for shrimp, balancing tight cover for babies with enough interior space for adults. The 7-hole layout increases accessibility while keeping the structure easy to clean and to tuck behind a rock or wood branch.
Why it helps: The numerous holes break line of sight and reduce stress. The interior stays shaded while side holes allow light flow so debris does not pack in. The ceramic surface encourages biofilm growth quickly in a mature tank.
Best for: Mixed-age colonies in 5–20 gallon tanks. Good for keepers who want a small but high-access hide to complement plants and wood.
Key notes:
- Compact footprint for nano aquascapes
- Multiple small entries for shrimplets
- Neutral color blends with substrate and rock
Setup tips: Rinse and soak to clear dust. Angle the tube slightly so one end is lower; this lets light flow move across the internal chamber. Add a small moss cap on top to increase micro-cover for babies.
Potential downsides: If placed in a dead zone, fine debris can collect at the bottom of the tube. Light flow and routine swishing keep it clear.
Quick matching guide
- Coconut dome for shaded retreat and natural look in nano tanks
- Three-layer ceramic for a single compact structure with multiple lanes
- Cholla wood for baby-heavy colonies and maximum biofilm texture
- Seven-hole ceramic tube for small tanks that need lots of entry points
Placement strategy for real results
Build a hide network
Use two or more hide types so shrimp can choose different textures and light levels. Put a coconut hut on the darker side, a ceramic stack in mid-light, and cholla near a plant thicket. This spreads the colony across the scape and reduces crowding.
Use flow to your advantage
Aim for gentle crossflow that brushes the entrances. This keeps oxygen fresh and prevents detritus from settling. If you see debris building inside, rotate the hide a few degrees or shift it closer to a flow path. Never place hides where shrimplets can be pulled toward an intake. Add a prefilter sponge to your filter inlet.
Leverage plants and moss
Attach moss to the roof or sides of ceramic and coconut hides. This makes micro-habitats for babies and doubles the grazing area. Add fine-leaved plants like subwassertang or pearlweed near the entrance to create layered cover.
Leave open lanes
Even in a dense scape, keep at least a couple of open channels between hides so shrimp can move freely during feeding and social interactions. This also helps you spot-check for health issues.
Maintenance that keeps hides effective
Gentle, regular cleaning
During water changes, lift each hide and swish it in a bucket of old tank water. This clears settled debris without killing beneficial bacteria. Frequency depends on your load, but every 2–4 weeks is a solid baseline.
Do not over-scrub biofilm
Biofilm is a major food source. Rinse and swish, but avoid scrubbing surfaces to a squeaky-clean finish. Keep the outer layer intact for grazing.
Watch for trapped detritus
If you see mulm building inside tunnels or under domes, adjust flow or slightly lift one edge to create a gentle pass-through. If your substrate is very fine, avoid burying the edges of hides where debris can pack in.
Replace soft cholla on schedule
Cholla slowly softens at the surface. Replace pieces that become mushy or lose structural integrity. Stagger replacements so the micro-ecosystem stays stable.
Setup checklist before adding hides
- Rinse all hides in tap water to remove dust
- Soak ceramic and coconut in dechlorinated water before use
- Boil cholla wood for 10–20 minutes to sink and reduce tannins
- Add a prefilter sponge to filter intake to protect shrimplets
- Place hides in gentle flow and away from intakes
- Attach moss for extra micro-cover if you keep babies
Common mistakes to avoid
- Using smooth plastic ornaments that grow little biofilm
- Piling heavy rocks that trap detritus and are hard to clean
- Leaving hides in dead zones where debris packs in
- Over-scrubbing and removing biofilm that shrimp need
- Skipping pre-soak or boil, which can cause floating wood or excess tannins
Conclusion
Great shrimp hides do more than block sight. They stabilize behavior, protect molts, and feed your colony through steady biofilm. A simple plan works best. Combine one natural dome, a multi-lane ceramic, and a piece of cholla for babies. Place them in light to moderate flow and wrap with moss for extra micro-cover. Keep a gentle maintenance routine that preserves biofilm while removing debris. With these steps, your shrimp will settle, breed, and display natural behavior that is easy to observe.
FAQ
Q: How many shrimp hides do I need per gallon?
A: Use one medium hide per 5–10 gallons, then add micro-hides with plants and wood. In breeder tanks, mix at least two hide types for better cover density.
Q: How should I prepare ceramic, coconut, or cholla hides before adding them?
A: Rinse everything. Soak ceramic and coconut in dechlorinated water. Boil cholla wood for 10–20 minutes to sink and reduce tannins, then rinse.
Q: Where should I place hides relative to filter flow?
A: Put them in gentle to moderate flow so light current passes across entrances. Avoid dead zones and keep them away from filter intakes. Use a prefilter sponge on the inlet.
Q: Are these hides safe for baby shrimp?
A: Yes. Choose rounded openings and porous textures like cholla and ceramic. Add moss or fine-leaved plants near entrances to increase micro-cover for shrimplets.
Q: How often should I clean shrimp hides?
A: Every 2–4 weeks, lift and swish hides in old tank water during water changes. Do not over-scrub, since biofilm is a key food source.