We are reader supported. When you purchase through links on our site, we may earn an affiliate commission. Also, as an Amazon affiliate, we earn from qualifying purchases.
Smart aquarium cabinet organization keeps your gear dry, accessible, and safe. It cuts down maintenance time, reduces clutter that can trap moisture, and lowers the risk of spills or electrical hazards. This guide walks you through practical selection criteria and reviews five reliable organizers that hold up in a humid stand. Every pick focuses on durability, airflow, and speed of access, so you can reach the right tool when your tank needs it.
Why aquarium cabinet organization matters
Cabinets concentrate humidity, salt creep, and messy hoses. Good organization limits corrosion, prevents tipping bottles, and keeps cords off the floor. It also speeds up water tests and dosing, because your kits and tools sit in predictable spots. Over time, a tidy stand protects your investment in equipment and livestock.
How to choose organizers that survive humidity
Measure before you buy
Measure your internal width, depth, and height at multiple points. Account for plumbing, the sump, and doors that reduce usable space. Note the door opening size too, since many organizers need to fit through the front even if they fit inside once angled.
What to prioritize: clearance above the sump, room to slide baskets out, and space to swing doors without hitting shelves.
What to avoid: tall, fixed shelves that block skimmer cups or filter socks.
What to remember: leave a service corridor for hands, test vials, and hoses.
Weight capacity and stability
Liquids are heavy and unbalanced loads tip easily inside narrow cabinets. Choose sturdy frames, drawers on rails, and low centers of gravity.
Aim for at least 15–20 lb per shelf to handle pumps, test kit boxes, and fluids without sagging.
Materials that resist moisture and salt
Pick powder-coated metal, stainless hardware, and quality plastics. Favor open wire or vented bins that let air move. Avoid raw particleboard and thin fabrics that trap dampness.
Tip: add silicone feet or a rubber mat to keep metal up off puddles during maintenance.
Access and workflow
Your most-used items should be reachable with one hand. Look for sliding baskets, caddies with handles, and modular bins you can pull out and carry to the sink.
Measure your sump clearance and door opening first, choose moisture-resistant materials, and favor sliding baskets or totes you can remove with one hand.
Cable and electronics safety
Water and power must stay separated and labeled. Elevate the power strip, route drip loops, and enclose excess cable slack without suffocating devices.
Use a covered cable management box for the power strip, route every cord with a drip loop, label both ends, and keep the box off the floor to avoid splashes.
Labeling and stock rotation
Label both the caddy and the bottles. Keep reagents and meds in clear bins so you can see levels at a glance. First-in, first-out reduces expired supplies.
5 Best Aquarium Cabinet Organizers for Fishkeepers
Each pick below is durable, easy to clean, and sized for standard aquarium stands. Mix and match to fit your cabinet footprint and equipment loadout.
1) Seville Classics 2-Tier Under-Sink Sliding Basket Organizer
This two-tier wire organizer uses smooth sliding baskets that pull fully forward, so you can access small items without reaching into the dark back of the cabinet. The open-wire design ventilates well and sheds drips, while the metal frame stays rigid under uneven loads. It is a simple, sturdy way to split storage vertically on one side of a sump.
Why it helps: Pull-out baskets bring foods, test kits, and dosing supplies to you, reducing the chance of knocking things over near electrics or the sump. Open mesh reduces trapped humidity.
Best for: Medium to large stands with at least one clear side next to the sump or filters.
Potential downsides: Wire baskets have openings; very small parts need a bin or tray liner to prevent tipping through the mesh. Measure door clearance to ensure the top basket slides out fully.
Setup tips: Place frequently used items on the lower basket for faster one-hand grabs. Fit shallow plastic trays inside the baskets to corral test vials and droppers. Add a non-slip mat or silicone feet to isolate the frame from floor moisture.
2) mDesign Plastic Portable Storage Caddy with Handle
This handled caddy divides small items into easy-to-carry compartments. The rigid plastic resists splashes and wipes clean quickly. It is excellent for gathering all test gear or coral foods in one pack-and-go unit you can lift out during maintenance and return to the same spot.
Why it helps: Maintenance becomes faster when everything you need is grouped. The carry handle keeps wet hands away from cabinet walls, and the smooth surfaces shed salt creep.
Best for: Test kits, droppers, coral foods, pipettes, small scissors, and tweezers.
Potential downsides: Dividers are fixed on most models, so oversized bottles may not fit upright. Tall spray bottles can make the caddy top-heavy if all placed on one side.
Setup tips: Dedicate one caddy to water testing and another to reef foods to avoid cross-contamination. Label compartments for alkalinity, calcium, nitrate, and phosphate to speed repeat tasks. Keep a microfiber cloth in an end slot for quick wipe-downs.
3) D-Line Cable Management Box Large
This hard-shell cable management box hides power strips and excess cord while allowing airflow through subtle vents. It keeps drips from reaching outlets and reduces cable tangles that can snag during maintenance. The low-profile lid removes easily for quick access.
Why it helps: Elevates and encloses the power strip to reduce splash risk while keeping cords orderly and labeled. The clean shape fits against the back wall of most stands.
Best for: Power strips, controller bricks, and slack loops from pumps, lights, and heaters.
Potential downsides: Do not overfill or cover hot-running devices. Ensure ventilation clearance and never block controller fan inlets.
Setup tips: Mount the box on standoffs or a shallow shelf to keep it off the floor. Feed cords from the sides to preserve drip loops. Add cable labels at both ends to simplify tracing during emergencies.
4) Command Large Wire Hooks
Adhesive wire hooks mount inside doors or along cabinet panels without drilling. They hold nets, algae scrapers, tongs, and towels where you can grab them fast. When it is time to reconfigure, they remove cleanly from most finished surfaces.
Why it helps: Vertical storage frees shelf space and dries tools between uses, reducing rust and odors.
Best for: Nets, scrapers, aquascaping tools, and a dedicated hand towel or gloves.
Potential downsides: Adhesion can weaken on raw wood or damp, dusty surfaces. Wipe panels with isopropyl alcohol and let them cure before mounting.
Setup tips: Mount hooks high on the door to avoid hitting the sump rim. Use one hook per tool to prevent tangles. Keep a spare pad set for relocation after deep cleans.
5) Sterilite 20 Quart Gasket Box
This clear-latched storage box uses a perimeter gasket to resist moisture and protect sensitive supplies. It is ideal for towels, spare tubing, filter media, and backup parts that should stay clean and dry. The see-through walls show inventory levels without opening the lid.
Why it helps: Keeps salt spray and cabinet humidity away from soft goods and spare components. Stackable design builds vertical storage if you have headroom.
Best for: Towels, sponges, algae pads, spare O-rings, and emergency airline supplies.
Potential downsides: Not intended for heavy fluids; avoid overloading to prevent lid flex. Always dry items before sealing to prevent trapped moisture.
Setup tips: Label the long and short sides for flexible placement. Add a small desiccant pack for extra moisture control. Store the box on a raised mat to avoid standing water contact.
Build a reliable layout
Plan your zones
Divide the cabinet into zones: top front for everyday access, side vertical panel for hooks, rear panel for cables, and bottom protected area for sealed storage. Keep wet processes like filter sock swaps to one side so dry goods stay dry.
Route hoses and wires deliberately
Keep hoses away from electrics and create drip loops on all cords. Bundle similar cords with reusable ties and color-code pump and heater lines.
Example loadouts
For nano tanks, a single sliding organizer and a caddy often cover everything. Keep a small latch box for towels and spare airline behind the front rail. Mount two hooks inside the door for net and scraper.
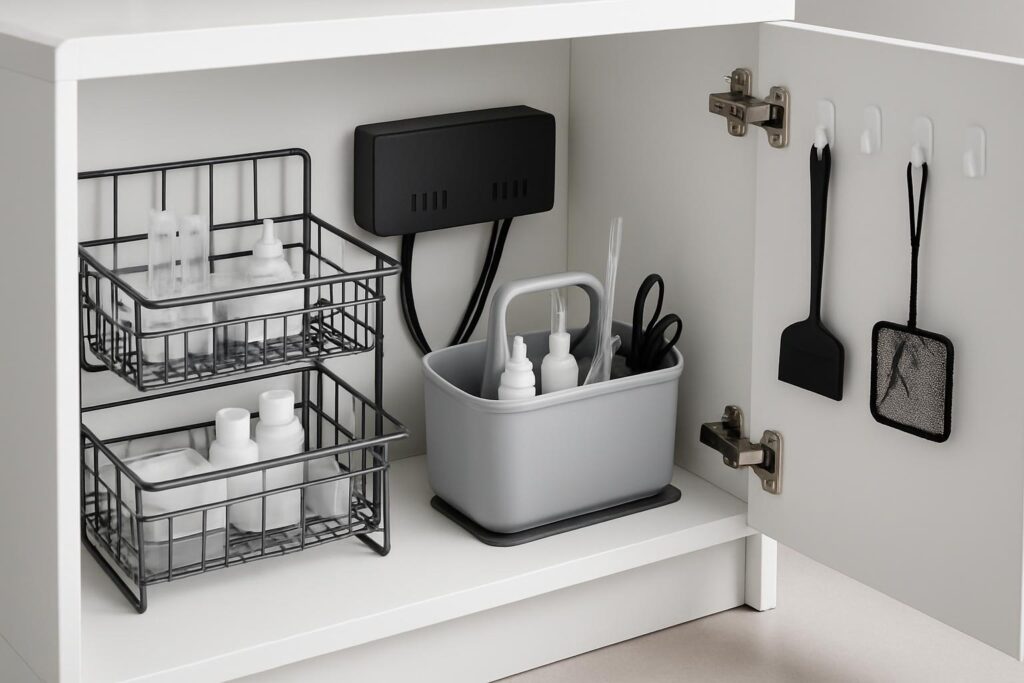
Place a 2-tier slider on one side for foods and test kits, mount a cable box on the back panel, hang tools on hooks inside the door, and keep a latch box on the bottom for towels and spare tubing.
Moisture control and long-term care
Ventilation matters
Cabinets trap humidity that leads to mold, swelling wood, and corroded fasteners. Improve airflow with vent holes, a passive grille, or a quiet USB fan aimed across the sump area.
Ventilate the cabinet, wipe salt creep weekly, and add desiccant packs or a small fan if humidity persists.
Weekly wipe-downs
Salt creep attracts moisture and can bridge electricity. Wipe door edges, organizer rails, and cable entries weekly. Keep a dedicated microfiber cloth in your caddy to speed work.
Label everything
Label cords at both ends, shelves, and bins. When something trips a breaker or a pump needs replacement, labeled gear cuts downtime. Use water-resistant labels or a paint marker on plastic.
Safety practices
Position electronics above the sump rim. Keep the cable box off the floor and ensure ventilation around power supplies. Never pinch cords under organizer feet or door edges. Confirm that every powered device has a drip loop below its outlet height.
Step-by-step setup
1) Empty, clean, and map
Remove all cabinet contents and wipe down walls and the floor. Measure clearance around plumbing and sketch your zones.
2) Place the big pieces
Install the 2-tier slider on the open side of the cabinet where it clears door swing. Set the cable management box along the back panel, leaving space for cord loops and access.
3) Add hooks and caddies
Mount adhesive hooks on the door after cleaning and drying the surface. Place caddies on the front of the slider or a shallow shelf for quick grabs.
4) Secure dry storage
Stow towels and backup parts in the gasket box on a thin anti-slip mat. Add desiccant if your cabinet runs damp.
5) Label and test
Label bins and cords, then open and close doors with bins extended to confirm clearances. Simulate a quick test session to see if the workflow feels natural.
Troubleshooting common pain points
Too many small parts rolling around
Add shallow trays into wire baskets and keep a small parts bin for airline adapters, O-rings, and test vial caps. Batch them by function.
Condensation under the stand
Improve sump lids and add airflow. Move absorbent items into the gasket box, and lift metal frames on silicone feet.
Power bricks overheating
Reduce stacking in the cable box, and keep at least a finger-width gap between bricks. If a device stays hot, mount it externally with air exposure and strain relief.
Maintenance checklist
– Weekly: wipe salt creep, check desiccant, confirm drip loops and dry gasket seals
– Monthly: re-label worn tags, re-seat adhesive hooks, vacuum cabinet floor
– Quarterly: empty sliding baskets and deep-clean rails, inspect cable box and power strip for corrosion
Conclusion
Cabinet organization is not about perfection. It is about fast access, fewer spills, and safer wiring. With a ventilated 2-tier slider, a handled caddy, a covered cable box, a set of door hooks, and a gasketed tote for soft goods, most stands become easier to service and safer for your livestock. Start with accurate measurements, place high-frequency tools front and center, and commit to a few minutes of weekly wipe-downs. The system pays for itself every time you reach for the right item with one hand and finish the job without a mess.
FAQ
Q: What should I prioritize when choosing an aquarium cabinet organizer?
A: Measure your sump clearance and door opening first, choose moisture-resistant materials, and favor sliding baskets or totes you can remove with one hand.
Q: How do I keep cords safe inside an aquarium cabinet?
A: Use a covered cable management box for the power strip, route every cord with a drip loop, label both ends, and keep the box off the floor to avoid splashes.
Q: How much weight should an under-sink shelf hold for aquarium gear?
A: Aim for at least 15–20 lb per shelf to handle pumps, test kit boxes, and fluids without sagging.
Q: How do I prevent mold and rust under the tank?
A: Ventilate the cabinet, wipe salt creep weekly, and add desiccant packs or a small fan if humidity persists.
Q: What is an easy layout for a 40–75 gallon cabinet?
A: Place a 2-tier slider on one side for foods and test kits, mount a cable box on the back panel, hang tools on hooks inside the door, and keep a latch box on the bottom for towels and spare tubing.