We are reader supported. When you purchase through links on our site, we may earn an affiliate commission. Also, as an Amazon affiliate, we earn from qualifying purchases.
Buying used aquarium equipment can save real money and speed up your build, but it also brings risks you can avoid with a clear plan. This guide shows you exactly how to check items, test them safely, clean them properly, and decide what is worth the price. Follow the steps, and you will reduce failures, avoid hidden problems, and get gear that serves your fish well.
Introduction
New aquariums and equipment add up fast. The used market is a smart path if you know what to look for. The goal is simple. Buy safe, compatible, cleanable gear that works as expected. Skip anything that raises doubts you cannot verify. You will learn how to inspect different equipment types, what parts to replace, how to test performance, and how to judge a fair price. Keep reading to build a checklist you can use on any platform or local meetup.
Start With Your Plan
Define your tank size, livestock, freshwater or saltwater, and target equipment list before you shop. Gear must match your tank and animals, not the other way around. Write the needed capacity for each device. Filters and skimmers have flow or tank ratings, heaters have wattage ranges, lights have coverage and intensity needs, and pumps have head height limits. Decide your must-have brands or features if reliability matters for your setup. Go in with numbers, not guesses.
Check Compatibility First
Look at the label or spec sheet and confirm capacity. Match heater wattage to tank volume. Match filter flow to stocking level. For lights, confirm coverage for your tank length and depth. For wavemakers and returns, check flow at your actual head height, not only the maximum rating. For saltwater gear like protein skimmers, match the skimmer size to the bio-load range you expect, not just the largest number on the box. For CO2 systems in planted tanks, ensure the regulator threading fits your region and cylinder type. Do not buy something that forces you into awkward workarounds or unsafe adapters.
Prioritize Safety
Electrical gear near water must be safe. Inspect power cords for cuts, stiffness, or exposed copper. Look for heat damage near plugs. Check housing seals for cracks and loose screws. On lights, look for moisture inside lenses or housings. On pumps and filters, inspect the motor block for hairline cracks and salt creep that suggests leaks. Plan to plug everything into a GFCI outlet with drip loops once home. If an item smells burnt, feels unusually hot, or trips protection devices during a brief test, stop and walk away.
Know What to Replace on Day One
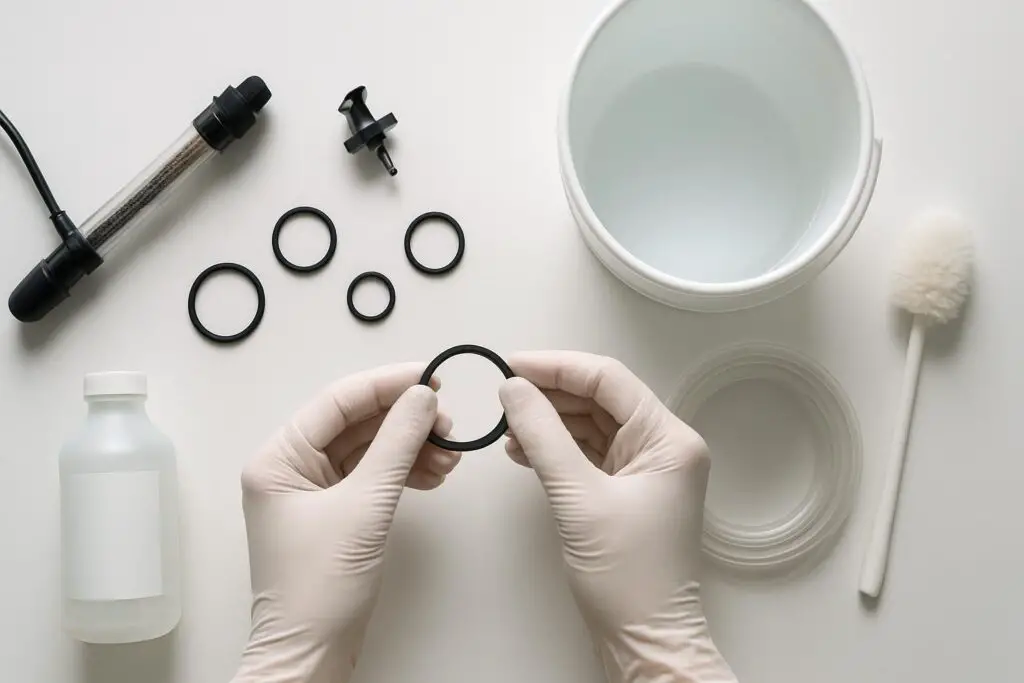
Some parts are consumables. Budget to replace them instead of gambling. Replace filter media, airline tubing, and suction cups. Replace or plan to replace O-rings and gaskets if they show any flattening or cracks. Replace UV bulbs, RO and DI cartridges, and expired test kit reagents. For lights, expect to replace old fluorescent bulbs. For impellers, check the magnet and shaft. If the magnet is swollen or pitted, replace the impeller. For CO2 systems, use fresh bubble counter fluid and new tubing rated for CO2. Consumables are cheap insurance.
Inspect Tanks Thoroughly
Glass Aquariums
Run a fingernail along silicone seams. Look for gaps, peeling, or brittle texture. Chips on edges near seams are riskier than tiny chips on exposed panel corners. Check center braces for cracks. A rimless tank should not show noticeable bowing when empty. If the interior silicone is yellowed, cut, or has bubbles near corners, expect a reseal or skip it. A clean, flexible seam is the goal.
Acrylic Aquariums
Check for deep scratches, hazing, and crazing that looks like fine internal cracks. Inspect bonded seams for bubbles or whitening. Moderate surface scratches can be polished, but compromised seams are a hard pass. Confirm the stand surface will fully support the bottom without pressure points.
Filters and Pumps
Canister Filters
Inspect clips, latches, and baskets. The main O-ring should be round and pliable, not flattened. Check priming buttons for smooth movement. Open the motor head and inspect the impeller and well for calcium buildup or swollen magnets. Examine hoses and quick disconnects for cracks. Ask for a wet test if possible, even a brief one with a bucket.
Hang-on-back Filters
Look for cracks in the intake tube and body. Check the level of wear on the flow control slider. Spin the impeller by hand and listen for grinding. Confirm the mount is not warped.
Return Pumps and Powerheads
Open them and check the impeller, shaft, and bushings. Inspect magnets for rust or chipped epoxy, especially on wet sides of wavemakers. Run them in a test container and listen. A steady hum is fine. Rattling, chirping, or repeated start and stop suggests worn parts or failing electronics.
Heaters and Temperature Control
Heaters are common failure points. Inspect the glass or housing for hairline cracks. Test in a bucket with a separate, reliable thermometer. See if the unit reaches setpoint and cycles normally. For best safety, use a separate temperature controller and alarm in the display system. Replace suspect heaters instead of gambling with livestock.
Lighting Systems
For LED fixtures, check for corrosion, flicker, and dead segments. Look for moisture under lenses and salt creep around seams. Run the fixture at full power for at least ten minutes and confirm both channels or multiple channels work. Listen for fan noise and inspect cooling fins for dust blockage. For older fluorescent systems, expect to replace bulbs, and inspect end caps and reflectors for rust.
Skimmers, Air Pumps, and Sumps
Protein skimmers should have intact bodies and cups without hairline cracks. Check the pump model and verify the needle wheel or mesh wheel is intact. Assemble the unit and confirm all O-rings seal. Air pumps should run without rattling. A slightly warm case is normal. Loud vibration suggests a worn diaphragm. Sumps and overflow boxes must be crack free with snug bulkhead seats. Dry fit bulkheads to ensure threads and flanges are in good shape.
RO DI and UV
RO DI systems should have clean canisters without stress cracks. Plan to replace all filters and the membrane if age is unknown. Check any inline TDS meter for function. Inspect fittings for leaks and confirm the included fittings match your plumbing. For UV sterilizers, inspect the quartz sleeve for cracks and staining. Assume you will replace the bulb. Confirm the ballast is compatible and powers on without odd smells.
CO2 Systems
Check the cylinder hydro test date. If it is past due, factor in the cost of testing or swap. Inspect the regulator for clean threads, a responsive needle valve, and a working solenoid. Test for leaks with soapy water on joints once pressurized. Verify the regulator thread standard matches your cylinder. Ensure the bubble counter is intact and not cracked. Replace check valves and tubing with CO2 rated parts.
Test Kits and Controllers
Liquid test reagents expire. If dates are missing or past due, replace them. Digital meters need calibration solutions and probes with known age. A pH probe that has been stored dry for months is often done. Controllers and power bars should have intact relays, no scorch marks, and stable firmware. Request a demonstration of switching outlets if possible.
Biosecurity and Pests
Used gear can carry disease and nuisance organisms. Ich, velvet, hydra, planaria, algae, and other pests can survive on wet surfaces. Plan to disinfect, rinse, and dry thoroughly. Avoid buying used substrate and porous media that can hold contaminants deep inside. Hardscape like rocks and inert decor can be cleaned if you are willing to do proper treatment.
How to Test Used Gear Before You Commit
Dry Checks
Start with a visual scan under good light. Look for cracks, missing screws, and warped plastic. Spin impellers by hand. Press buttons and turn dials for smooth action. Verify labels and model numbers so you can confirm specs later.
Wet and Power Tests
For pumps and filters, run in a bucket or sink. Confirm flow at various settings. Check for leaks around seals. For heaters, test in a separate container with a reliable thermometer. For lights, power on fully and watch for flicker and uneven output. If the seller refuses basic testing with reasonable effort, skip the item.
Cleaning and Disinfection That Works
Remove debris first. Soak mineral deposits in white vinegar diluted one to one with water or use a mild citric acid solution until crusts soften. For full disinfection, use a bleach solution at one part unscented bleach to twenty parts water for about fifteen minutes. Rinse thoroughly, then use a dechlorinator rinse. Air dry completely for at least twenty four hours. Do not bleach porous biological media you plan to preserve. Replace sponges and fine media instead of trying to salvage them. For metal parts that contact water, avoid bleach and use vinegar or manufacturer guidance.
What to Avoid Entirely
Skip gear with cracked housings, frayed cords, burnt smells, or missing critical parts that are not available as spares. Avoid magnets with exposed metal or rust. Avoid lights with moisture inside the body. Avoid tanks with compromised seams or cracked braces. If you cannot verify safe function with a reasonable test, do not buy it.
Fair Prices and Negotiation
A quick rule is thirty to sixty percent of current new price, adjusted for age, condition, brand, and included extras. Near new items with receipt and warranty can justify more. Anything at seventy percent or higher needs to be very recent, complete, and proven. Factor in replacement consumables you will buy on day one, like bulbs or cartridges. Be polite but firm. If the price does not make sense after you add your maintenance costs, move on.
Questions To Ask Every Seller
How old is the item. Was it used in freshwater or saltwater. Any repairs or issues. Why are they selling. Which parts are included. Is a test possible. Can they share proof of purchase if recent. Honest answers plus a chance to test tell you most of what you need to know.
Red Flags You Should Not Ignore
Refusal to test simple functions. Strong chemical or burnt smells. Water inside LED lenses. Large salt creep trails around motor seams. Cracked braces or seams on tanks. Swollen or rusted magnets on pumps. Price far above fair used value without warranty. If any of these appear, walk away.
Transport and Setup Tips
Move tanks empty. Protect panels with blankets or foam and keep the tank upright with the bottom fully supported. Never lift by the rims or braces. Drain and dry canisters and pumps. If you plan to keep beneficial bacteria, move media submerged and aerated, then set up the system within hours. Once home, do a twenty four hour leak test of tanks and plumbing in a safe area such as a garage. Use GFCI outlets and drip loops. Calibrate heaters and controllers. Verify temperature with a separate thermometer.
Category Checklists
Tank and Stand
Inspect seams and braces. Check level and flatness of the stand. Confirm the stand fits the tank footprint and allows access to plumbing. Look for water damage and swollen panels on wooden stands.
Filtration
Canisters need good seals, intact baskets, and smooth impellers. Hang-on-back units need crack free bodies and stable mounts. Sumps need crack free baffles and precise bulkhead seats. Overflows need straight weirs and intact U-tubes or boxes.
Circulation and Return
Test pumps under load when possible. Listen for noise. Confirm the cord length reaches your setup. Inspect any controllers or power bricks for clean labels and firm connectors.
Heating and Cooling
Heaters must pass a bucket test. Chill solutions and fans should run without vibration. Confirm mounting hardware is complete.
Lighting
LEDs should power on fully with stable channels. Fans should be quiet. No condensation inside. Mounts or hanging kits must be included or readily available.
Water Treatment
RO DI units need crack free housings and fittings you can match. Replace filters and the membrane if age is unknown. UV units need clear quartz sleeves and working ballasts, with bulbs replaced.
Gas Systems
CO2 cylinders must be in date for hydro testing. Regulators should hold stable pressure and not leak. Solenoids should click on and off cleanly.
Meters and Tests
Assume you will buy fresh reagents. Probes require proper storage and calibration. Controllers should switch loads consistently and show error free displays.
Warranty, Manuals, and Parts
Spare parts availability matters. Check that impellers, O-rings, and mounts are still sold. Download manuals for programming and safety info. Some brands offer transferable warranties. If so, ask for the original receipt.
When to Walk Away and When to Say Yes
Say no when safety is in doubt, when the seller blocks basic testing, or when the price is out of line after you factor in new consumables. Say yes when the item fits your plan, passes inspection and testing, has replaceable wear parts, and is priced in the thirty to sixty percent band. A good deal is the one that saves you money without adding risk.
Conclusion
Buying used aquarium equipment safely is a process. Define your needs, verify compatibility, inspect for damage and wear, test in person, plan to replace consumables, disinfect correctly, and pay a fair price. The extra care up front guards your livestock and your budget. Use the checklists here each time you shop, and you will build a reliable system at a fraction of the cost.
FAQ
Q: How much should I pay for used aquarium equipment
A: A quick rule is thirty to sixty percent of current new price, adjusted for age, condition, brand, and included extras. Anything at seventy percent or higher needs to be very recent, complete, and proven.
Q: What should I replace immediately when buying used gear
A: Replace filter media, airline tubing, suction cups, and any flattened O-rings or gaskets. Replace UV bulbs, RO and DI cartridges, expired test kit reagents, and old fluorescent bulbs. Plan to replace worn impellers and use fresh CO2 bubble counter fluid and tubing rated for CO2.
Q: How do I disinfect used aquarium equipment safely
A: Soak mineral deposits in white vinegar diluted one to one with water. For full disinfection, use a bleach solution at one part unscented bleach to twenty parts water for about fifteen minutes, rinse thoroughly, then use a dechlorinator rinse and air dry completely for at least twenty four hours. Do not bleach porous biological media you plan to preserve.
Q: What are key red flags that mean I should walk away
A: Refusal to test simple functions, frayed cords, burnt smells, water inside LED lenses, large salt creep trails, cracked braces or seams, swollen or rusted magnets, missing critical parts that are not available, and prices far above fair used value without warranty.
Q: How do I leak test a used tank
A: Place the tank on a level surface in a safe area, add a foam pad if needed, fill slowly, and leave it for twenty four hours. Check seams for moisture and wipe under edges to detect dampness. Never move a filled tank.