We are reader supported. When you purchase through links on our site, we may earn an affiliate commission. Also, as an Amazon affiliate, we earn from qualifying purchases.
Air valves and check valves are small parts that decide whether your aquarium runs smoothly or turns into a flood risk. A stable stream of air keeps filters efficient, fish oxygenated, and biofiltration strong. A tiny backflow can ruin pumps, damage furniture, and stress livestock. For 2026, reliability, tight seals, and precise flow control matter more than ever, especially as more hobbyists stack air-powered sponges, breeders run rack systems, and nano tanks depend on quiet air setups. This guide explains what to buy, how to pick correctly, and the six best air valves and check valves to anchor your setup.
Why air valves and check valves matter in 2026
More aquariums are using air-driven filtration because it is cost-efficient, scalable, and dependable. Sponge filters, box filters, and airstones only perform well if two things happen: airflow is dialed in and water cannot flow backward into the pump. Air valves and check valves handle both jobs.
With multiple tanks or devices on one pump, a good gang valve prevents one outlet from hogging airflow while others starve. With long runs of airline below the water line or pumps placed under the tank, a quality check valve prevents a siphon when power cuts out. One failure can harm fish and wipe out equipment. Getting these right removes a major point of risk.
Quick buying guide
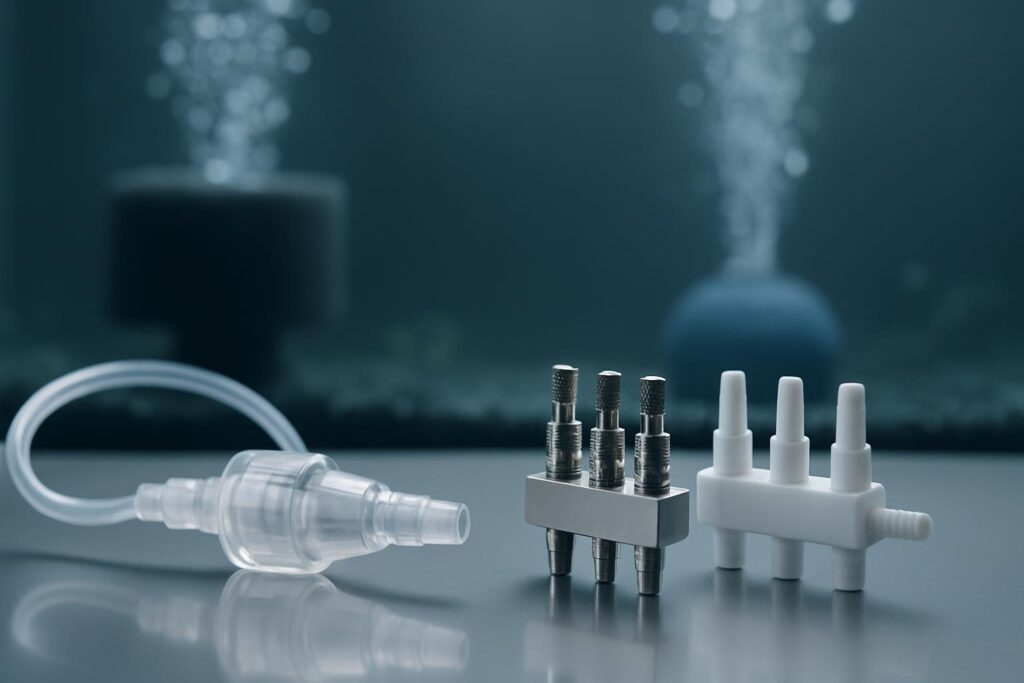
Air valve vs. check valve
Air valves control how much air goes to each device. Check valves allow air to pass one way but block water from coming back down the line.
Key features to look for
Seal quality: A check valve must hold a seal even at low pressures and after months of moisture exposure.
Low cracking pressure: The valve should open under gentle airflow from small pumps.
Material durability: ABS or acrylic bodies for check valves; metal manifolds for precise control; corrosion resistance in humid cabinets.
Standard size: Fit standard 3/16 inch airline tubing used in most freshwater and saltwater aquariums.
Outlet count and adjustability: For air valves, match the number of tanks or airstones, and choose smooth, precise knobs or levers.
Noise impact: A stable valve setup reduces back pressure and pump rattle.
Placement rules that prevent failure
Keep the check valve above the tank’s water line if possible. If it must sit below, test it for backflow by briefly shutting off the pump. Push airline tubing fully over barbs for airtight connections. Place gang valves where you can adjust them easily without tugging on soft lines.
The 6 Best Aquarium Air Valves and Check Valves for 2026
1) Tetra Whisper Check Valve, 2-Pack
Trusted by beginners and breeders, this compact check valve is designed for standard aquarium airline. Its internal diaphragm is tuned for low cracking pressure, which keeps nano pumps and low-output air systems flowing while still stopping back siphons during outages.
Why it helps: Reliable one-way protection that prevents water from entering your air pump and cabinet. The small footprint fits tight stands and rack systems without adding weight to soft airline tubing.
Best for: Single-tank setups, nano aquariums, and anyone running air pumps below the tank or in a cabinet.
Potential downsides: As with most plastic-bodied check valves, long-term exposure to ozone or high-heat enclosures can age the diaphragm faster. Inspect and replace periodically.
Setup tips: Arrow points from pump to tank. Push airline on fully until snug. Test by switching power off and watching for any reverse movement of water in the line.
Verdict: A simple, dependable baseline choice. Keep a spare in your kit and protect every airline that drops below the water level.
2) Fluval Check Valve
Fluval’s check valve pairs a clean housing with a responsive one-way mechanism that works well with both modest and stronger air pumps. The clear body helps you verify orientation and spot moisture buildup at a glance.
Why it helps: Low resistance means less strain on small pumps while still blocking backflow. Visual clarity simplifies quick inspections during maintenance.
Best for: Display aquariums where tidy gear matters, nano to mid-size tanks, and any layout where you want fast visual checks.
Potential downsides: Single units cost more than bulk packs. For large systems needing many lines, consider mixing this with a budget multipack for non-visible lines.
Setup tips: Install vertically if possible to minimize condensation resting on the diaphragm. Place within easy reach for quarterly checks.
Verdict: A clean, reliable one-way solution with low opening pressure and easy visual verification.
3) Pawfly Aquarium Check Valve, 6-Pack
This bulk set covers multiple tanks, dual-sponge filters, and airstones without stretching your budget. Each valve fits standard airline tubing and uses a straightforward one-way design to keep water away from pumps and power strips.
Why it helps: You protect every airline in your system at once, including future expansions. Bulk packs encourage replacement before a worn diaphragm fails.
Best for: Breeder racks, fish rooms, and hobbyists running several air-driven devices per tank.
Potential downsides: Slightly higher opening pressure than some premium units. For very weak nano pumps, test and place the valve closer to the pump side for better performance.
Setup tips: Keep lines short between the pump and each valve to reduce pressure loss. Label lines if you run many similar valves in one cabinet.
Verdict: Solid protection at scale. Good for anyone standardizing safety across multiple tanks without compromising airflow too much.
4) Penn-Plax Air Control 4-Way Gang Valve
Penn-Plax builds a dependable plastic manifold with four individually adjustable outlets for 3/16 inch airline tubing. The levers allow you to balance airflow precisely across sponges, box filters, and airstones, even when line lengths differ.
Why it helps: Balancing airflow prevents dead corners in sponge filters and ensures even bubble patterns across multiple tanks or devices.
Best for: Two to four devices on one pump, nano racks, and hobbyists wanting quick manual control without tools.
Potential downsides: Plastic bodies are light but can shift if lines tug on them. Mount or anchor to reduce stress on fittings.
Setup tips: Place the gang valve near the pump for easiest balancing. Start with all outlets half open, then fine-tune until each device performs as expected.
Verdict: A proven, budget-friendly controller that makes a single air pump behave like a custom multi-device system.
5) Marina 2-Way Air Control Valve
Marina’s compact 2-way valve is ideal for splitting a single pump to run a pair of devices with individual flow control. The form factor is small, the levers are smooth, and the body integrates seamlessly in discreet display setups.
Why it helps: Precise adjustment on two lines avoids overdriving an airstone while starving a sponge filter.
Best for: Small or medium displays running both an airstone and a sponge, or a sponge plus air-driven ornament.
Potential downsides: Only two outlets. If you plan to expand soon, consider stepping straight to a 4-way or 6-way manifold.
Setup tips: Mount or clip the valve to prevent it from dangling. Keep outlet lines equal in length when possible to reduce rebalancing later.
Verdict: A tidy, reliable 2-line controller that keeps a minimalist setup balanced and quiet.
6) AQUANEAT Metal Air Flow Control Valve, 6-Way Manifold
AQUANEAT’s metal manifold steps up durability and precision with individual needle-style adjustments. Six outlets let one strong pump serve a rack of nano tanks or a cluster of sponges and airstones with consistent, repeatable settings.
Why it helps: Metal bodies resist warping and pressure spikes. Fine control smooths out micro-adjustments that keep sponges drawing and airstones producing uniform bubbles.
Best for: Fish rooms, breeding racks, and advanced hobbyists who value exact tuning across many devices.
Potential downsides: Heavier than plastic and can transmit vibration if mounted against thin panels. Use a soft mounting pad to absorb hum.
Setup tips: Install a check valve on the main feed line before the manifold. Label each outlet and chart your initial valve positions to make maintenance faster.
Verdict: A robust, scalable controller for multi-tank systems and anyone who wants pro-level fine-tuning.
How we chose
Selection focused on real-world stability and ease for beginners:
– Proven brands with long track records across freshwater and saltwater systems
– Consistent seals that withstand moisture cycles and back pressure
– Low opening resistance for small pumps and nano tanks
– Standard airline compatibility
– Clear adjustment on air valves, from simple levers to fine metal controls
Installation that avoids common pitfalls
Check valves
– Orientation matters. The arrow points from the pump toward the aquarium.
– Aim for vertical placement to shed condensation away from the diaphragm.
– Keep the valve close to the pump to reduce pressure loss, especially with small pumps.
– Test the seal. Turn power off and watch the airline for reverse movement. Any backflow means reposition or replace.
Air valves and manifolds
– Mount the valve on a firm surface. Avoid dangling manifolds that pull on soft tubing.
– Trim lines to similar lengths when splitting to multiple devices. It simplifies balancing.
– Start with all outlets partially open. Adjust one outlet at a time while observing sponge draw or bubble output.
– Add a check valve on each downstream line if outlets dip below the tank water line.
Maintenance and troubleshooting
Monthly quick checks
– Squeeze airline connections to confirm a tight fit and no cracks.
– Flip power off briefly to confirm no back siphon. Watch, then restore power immediately.
– Observe bubble patterns. Sudden weakness can mean a clog, kink, or valve drift.
Every 3–6 months
– Replace any check valve showing moisture buildup that does not clear or if cracking pressure seems to rise.
– Clean or replace airstones to reduce back pressure on pumps and valves.
– Rebalance gang valves after major maintenance or if you modified line lengths.
Common issues
– Air stops after adding a check valve: Move the valve closer to the pump, shorten the run, or step up pump output.
– One outlet blasts while others fade: Equalize line lengths, then fine-tune the gang valve.
– Rattle or hum: Relieve back pressure by opening outlets slightly and use soft mounts under valves and pumps.
Who should prioritize premium parts
– Breeders and fish rooms with dozens of lines. A single weak check valve can drain an entire manifold.
– Saltwater keepers using air on skimmers or refugiums where salt creep can stiffen diaphragms faster.
– Anyone placing pumps below the water line. Backflow risk is higher and failure costs more.
Simple start templates
Single nano tank
– One check valve near the pump, one airstone or sponge filter, no gang valve needed.
Two devices on one pump
– One 2-way air valve with independent control to balance output, plus a check valve on each line.
Four to six tanks on a single pump
– One metal 4–6 way manifold, a check valve before the manifold, and optionally a check valve on each outlet that dips below water level.
Final recommendations
If you want the simplest path to safe, balanced air systems in 2026, start with a dependable check valve on every line that can siphon, then match your air valve to your device count. For single or nano setups, Tetra Whisper Check Valve makes protection effortless. For tidy displays, Fluval’s clear housing adds quick visual checks. For multi-line safety at scale, Pawfly’s bulk pack keeps spares ready. On the control side, Penn-Plax covers four-line balancing easily, Marina keeps two-way systems sleek and simple, and AQUANEAT’s metal manifold delivers fine control for racks and advanced users. Install carefully, test monthly, and replace aging parts before they fail. Your filters will run smoother, your pump will last longer, and your fish will stay safer.
FAQ
Q: What is the difference between an air valve and a check valve?
A: Air valves control how much air goes to each device, while check valves allow air to pass one way but block water from coming back down the line.
Q: Where should I place a check valve for best protection?
A: Keep the check valve above the tank’s water line if possible, close to the pump, oriented with the arrow from the pump toward the aquarium, and test it by briefly shutting off the pump to confirm no backflow.
Q: How many outlets do I need on a gang valve?
A: Match the number of outlets to the number of tanks or air-driven devices you plan to run, and choose smooth, precise controls for easier balancing.
Q: How often should I replace check valves?
A: Inspect monthly and consider replacing every 3–6 months if you see moisture that does not clear, rising cracking pressure, or any backflow during tests.
Q: What should I do if one outlet blasts air while others fade?
A: Equalize airline lengths, then fine-tune the gang valve until each device produces the desired bubble output.